The Client Dashboard is a feature accessible on the MeasurePM Mobile-App. From the dashboard, users are able to return to the employee dashboard, view appointments or appointment notes*, render appointments*, stop appointments*, view appointment history, view SOAP note history, or download the profile for offline. This dashboard is accessible both during and active appointment and outside of an active appointment.
* Indicates a menu option only accessible in an active appointment
Accessing the Client Dashboard
To access the Client Dashboard within an appointment, simply select Start Now or Resume for a given appointment and you will be automatically brought to it. If already in an appointment, users can select the home icon from the bottom navigation bar to access the dashboard at any point.
If outside of an appointment, users can access the dashboard manually by selecting to the Client Profiles from the Employee Dashboard. From there, select the name of the client for whom you would like to view the dashboard of. You can either search for a client’s name using the search bar or scroll to find the client’s name in the list. Once you found, select their name, and you will be brought to the Client Dashboard.
Client Dashboard
View of Client Dashboard Within an Appointment

View of Client Dashboard Outside of an Appointment

Sticky Notes
In the top right hand corner, a yellow sticky note is visible. Selecting this icon allows you to add notes that all providers can view and edits, functioning like a traditional sticky note. While there are multiple sticky note locations throughout the Mobile-App, the dashboard note is the only one that syncs to the web, and it can be viewed and edited, within the web client profile.

For more information on sticky notes, please see this guide: Sticky Notes
My Dashboard
Select My Dashboard to return to your employee mobile dashboard.
Appointments
Select Appointments when not in an active appointment to view appointments for the client. By default, you will be brought to a screen viewing the appointments for today’s date. However, you can view past and future appointments by scrolling along the date bar at the top. Alternatively, users can filter appointments by specific date or filter by provider. Users can also add appointments, if they have permission to do so, by selecting + Add Appointment.
From the appointment view, users can view the start time and duration of the appointment, the provider, the service, and the location of the appointment. Users can also identify the status of the appointment as well as the SOAP Note status from this view:
The colored circles next to the appointment indicates the appointment status.
- Blue= Rendered Appointment
- Green= Confirmed Appointment
- Red= Cancelled Appointment
- Checkmark inside= Appointment signature present
The hamburger icon below the color circle represents the SOAP note status.
- Grey= SOAP Note not started
- Red= SOAP Note in progress, but not submitted
- Green= SOAP note submitted

Change Client
The Change Client option will only be available outside of an active appointment. Use this option to be taken back to the client list. From there, you can search a client’s name or scroll to a client’s name to open the dashboard for that client as before.
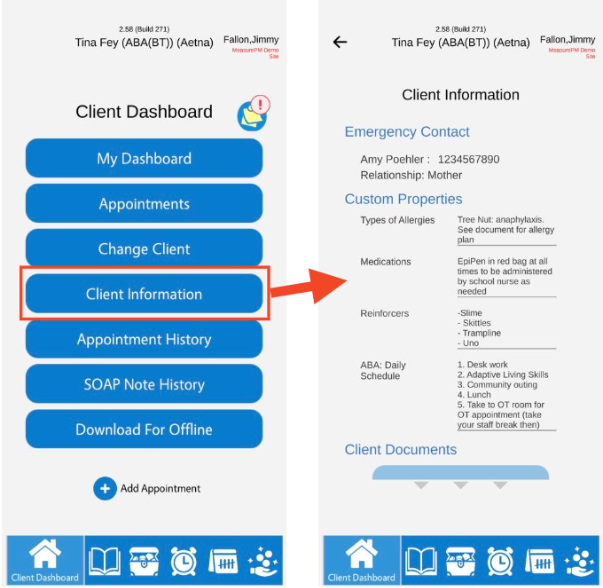
Client Information
The client information page on the Mobile-App allows users to easily access Client Emergency Contact information, Client Custom Property Information, and Client Specific Documents. To note, all information displayed on this page is view only. All editing and setting up for this page are done on the web:

For more information on this please see this guide: Client Info tab on the Mobile-App
Appointment Notes*
If in an active appointment, Appointments will be replaced with Appointment Notes. Select Appointment Notes to view or enter SOAP Notes, view or enter Provider Notes, or view Scheduling Notes for the current appointment.
SOAP notes on the MeasurePM Mobile-App:
- To enter a SOAP Note, enter Appointment Notes and tap on the appropriate note option
- Next, tap on each interactive field and enter the appropriate information, which may include checked boxes, dropdown menus, text entry boxes, radio buttons, and/or signatures.
Please note, some fields may be configured to auto populate session information including client name, session location, rendered date, rendered minutes, etc.
- Once you have entered all required information, select on Save as Draft or Submit as appropriate.
- Once Submit has been selected, only users with permission can return the note to a draft for editing.

Provider Notes on the MeasurePM Mobile-App
- To enter a Provider Note, enter Appointment Notes and tap on the appropriate note option.
- Next, users may select an available Note Status (if configured by facility) and a Note Service. These are optional selections.
- Users may then tap on the text area and enter their notes.
- Once done, select Save Notes, or select Close to discard the note.

Scheduler Notes on the MeasurePM Mobile-App:
- To view or enter a Scheduler Note, enter Appointment Notes and tap on the appropriate note option. Please note, a Scheduler Note may also be added when the appointment is scheduled, from either MeasurePM’s website or Mobile App. Therefore, when you open Scheduler Notes from Appointment Notes, there may already be a note there.
- Next, if permission is granted, users may then tap on the text area and enter their notes or edit notes that are already there. Note that users will be able to view the notes regardless of permission.
- Once done, select Save Notes, or select Close to discard the note.

Please note, you can select Close at any time to return to the Client Dashboard.
Appointment Render*
When finished with an active session, select Appointment Render to render the completed session. Please note, this will not be available unless in an active appointment. Depending on site configurations the following options may be available:
- Commit Behaviors with Zero Incidents: This checkbox will be available if there are behaviors for which no data was recorded. Check the box to have all behaviors without data be recorded and graphed as 0 occurrences.
- Commit Programs in Progress: This checkbox will be available if there are programs in progress, and enough data has been collected to commit the program, but the user has not yet selected the commit button. Check the box to commit that data. If the user does not select this option or have programs with data which does not have enough trials to commit, the data will remain on the profile for the next session.
- Commit Programs at Zero: This button will be available if there are frequency or duration programs mapped to the client profile for which no data were recorded. Use the select button to choose the programs you would like to commit at 0. Once a program is selected, it will turn green. Select OK when done and you will return to the render screen.
- Apply Signature to all Unsigned Appointments: This checkbox option allows parents/caregivers to sign any previously rendered and unsigned appointments at one time. The presence of this will be dependent upon permissions in the admin page. Select OK to confirm the rendered appointment or select Cancel to return to the appointment.
If authorized to do so, you can alter the start and end times of the appointment by dragging the times. Users can also collect signatures when rendering by having parents/guardians sign in the box. This is optional depending on facility configurations. Please note, if you are providing telehealth services or if the guardian is not available to confirm your session, please refer to your company’s guidelines regarding collecting caregiver signatures.
Users can also optionally add a name of the parent/guardian below the signature.

Appointment Stop*
If you would like to pause an active session, select Appointment Stop. This will stop or pause an appointment without rendering it. Please note, this option is only available during an active appointment. If selected, running timers will be paused. After selecting Appointment Stop, a pop up will prompt you to confirm you would like to stop the appointment. Select OK to stop the appointment or select Cancel to return to the appointment.

Appointment History
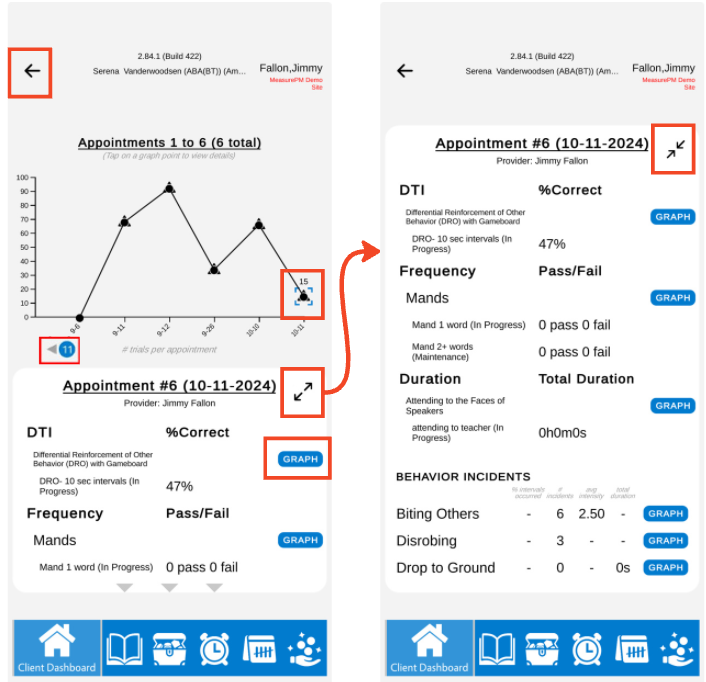
Select Appointment History, within or outside of an active appointment to view a summary of all programs and behaviors that occurred during a given session. Here users may view total trials per session, individual program and behavior records as well as individual program or behavior graphs. Note, access to this tab is permissions based (i.e., only those with the related permission granted can access Appointment History). 
The graph shown below depicts one data point representing each appointment for the client, across providers. The value of the data point is the number of trials completed during that appointment.
- Select a data point for any given appointment. This will result in a table summarizing any program or behavior data that was collected during the given appointment.
- Users can scroll through the appointment data to view:
- The number and date of the appointment.
- The provider who ran the appointment.
- How many trials were run that appointment.
- The individual data per committed program/behavior.
- Users may select the Graph button to view the corresponding graph for the program or behavior.
- To view additional appointment dates, select the numbered arrows, and the graph will pan left/right to show addional data.
- Select the bidirectional arrows in the data table to expand the data table and temporarily hide the graph. To collapse, select the same icon again.
- Select the back arrow at any time to return to the Client Dashboard.

SOAP Note History
Select SOAP Note History to view all SOAP Notes for previous appointments and/or make edits to SOAP Note drafts. Note, access to this tab is permissions based (i.e., only those with the related permission granted can access SOAP Note History). 
- To view past SOAP Notes, click and drag the blue circle along the date bar. Any date with a green triangle above it indicates there was a session on that day and therefore there is a SOAP Note available for that day. You will notice it is possible to have multiple appointments on the same day and therefore multiple SOAP Notes.
- Alternatively, users can filter SOAP Notes by date using the Filter option at the bottom of the screen or filter by provider by using the Provider Filter search bar at the top of the page.
- To view more dates, use the blue numbered arrows or drag the blue circle along the date bar.
- If the user has been granted appropriate permissions, they will be able to edit and submit SOAP Notes. To edit, simply tap on any field in the note and enter the required information.
- Users may again save notes as a draft or submit their finalized SOAP Note once all information is completed.
- Once submitted, users with permission will be able to return to draft and edit the note again.
- Once editing is completed, select Save as Draft or Submit to finalize the note.

Download for Offline
Users can download a client profile for offline if they desire. Doing this ensures all up to date clinical information will be accessible offline. When selected, the updated profile features will be downloaded for offline use. When you select Download for Offline you will see a pop-up indicating how many program or behavior configurations have to be downloaded. Wait until all are downloaded and the pop-up will close automatically.

If you run a session offline, the next time you log on when you are connected to a network, you will be asked to upload all data collected in offline mode.
Measure tip: Select Download for Offline regularly so you always have the most up to date information available if there is an unexpected network or wifi outage.
For any additional comments or questions, please reach out to support@measurepm.com.
