
The Secondary Claims module allows users to review and generate claims for secondary payers. Our new enhancements provide additional filtering options and added functionality, enabling a more streamlined workflow and ensures compliance with payer requirements.
Accessing Secondary Claims
Navigate to Billing > Secondary Claims
From the Secondary Claims screen, users will find these new filter options:
- Enter the From Date and To Date.
- Click Continue.
- Select the applicable Funding Source.
- Optionally, Select a Zone if additional filtering is appropriate.
- Select one or multiple Client(s), if needed.
- Click View.
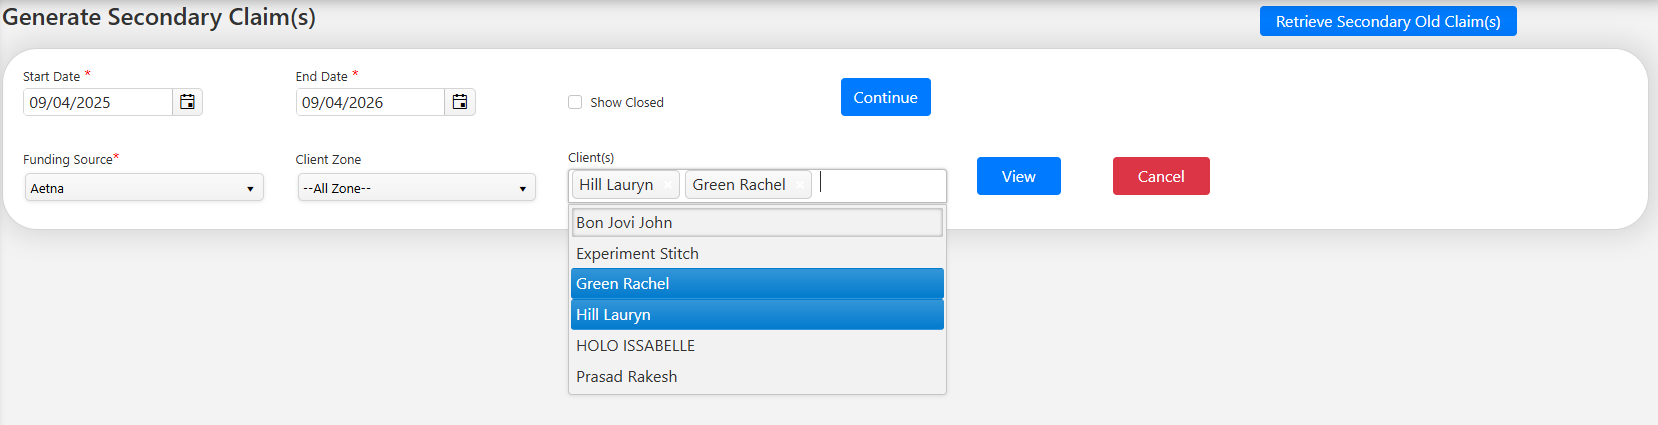
The Funding Source dropdown will only display funding sources that have a secondary authorization in MeasurePM.
The available clients are determined by your selected filters. If a Zone is selected, the Client list will include clients matching the date range, Funding Source, and Zone. If no Zone is selected, clients will be filtered by the date range and Funding Source.
Tip: You do not have to select a client. Leave Client(s) blank to view eligible transactions for all clients matching the selected filters.
If one or more clients are selected, only transactions for those clients will display.
Reviewing Secondary Claim Adjustments
Once the eligible transactions are displayed, adjustment information can be entered and/or reviewed prior to generating the claim.
In the grid, columns are available for all of the standard adjustment group codes: CO, CR, OA, PR, and PI.
Each adjustment group includes a Reason Code and Amount field.
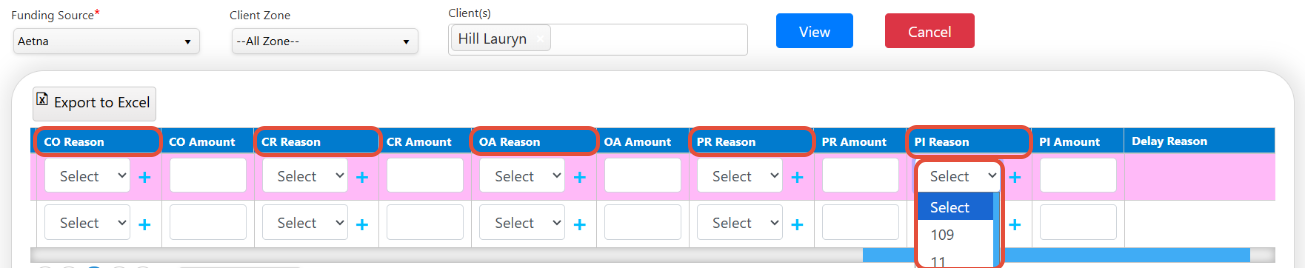
Adjustment information received from the primary payer may automatically populate within these fields if the payment was processed through an ERA.
Users can review the information and update the adjustment Reason Code or Amount when necessary.
Adding Multiple Adjustments
A secondary claim may contain more than one adjustment within the same adjustment group. MeasurePM allows multiple Reason Codes and Amounts to be entered for these situations.
To add another adjustment:
- Locate the applicable adjustment group, such as CO, CR, OA, PR, or PI.
- Enter or select the first Reason Code and Amount.
- Click the + (plus) icon next to the Reason Code.
- An additional Reason Code and Amount field will appear beneath the original adjustment.
- Enter the additional adjustment information.
Up to three additional adjustments can be added to each adjustment group.
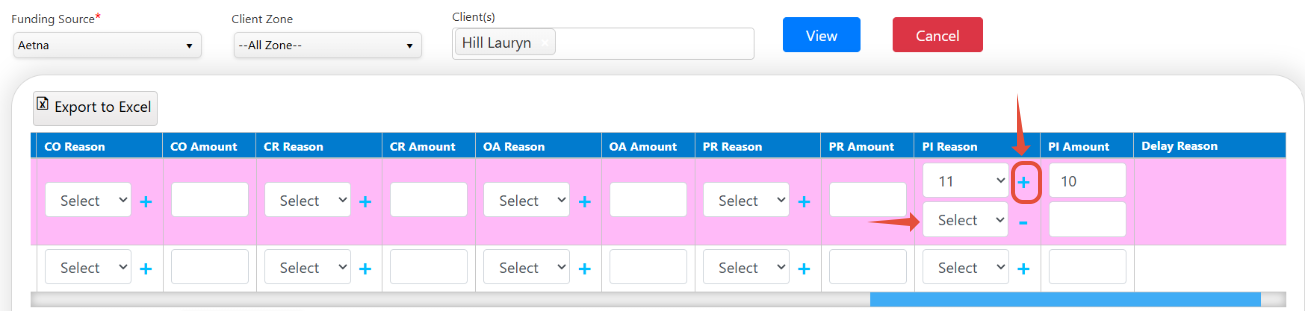
Additional adjustment rows belong to the same claim displayed directly above them, so the remaining claim information will not be repeated on those rows.
Removing an Adjustment
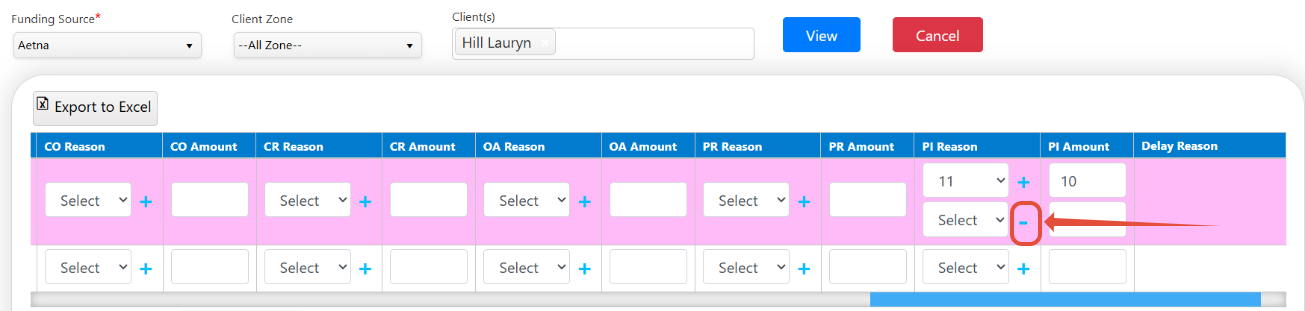
Additional adjustment rows include a – (minus) icon.
Click the – icon to remove an adjustment that is no longer needed.
Important: The same Reason Code cannot be entered more than once within the same adjustment group. If a duplicate Reason Code is entered, MeasurePM will display a validation message.
Example
For example, if a claim contains two patient responsibility (PR) adjustments, the PR section can contain:
| Adjustment Group | Reason Code | Amount |
|---|---|---|
| PR | 1 | $20.00 |
| PR | 2 | $15.75 |
Similarly, a contractual obligation (CO) adjustment could contain:
| Adjustment Group | Reason Code | Amount |
|---|---|---|
| CO | 45 | $100.00 |
| CO | 131 | $250.00 |
MeasurePM will include the applicable adjustment information when the secondary claim is generated.
Duplicate Reason Codes
Each Reason Code can only be used once within the same adjustment group.
If the same Reason Code is entered more than once within a group, MeasurePM will display a validation message and the duplicate will need to be corrected.
Adjustments Received from the Primary ERA
When a primary ERA contains multiple adjustments within the same adjustment group, MeasurePM will automatically populate the applicable Reason Codes and Amounts into the additional adjustment rows.
For example, if the primary ERA contains multiple PR adjustments, each applicable PR Reason Code and Amount will display within the secondary claim adjustment section for review.
Users should review the populated adjustment information before generating the secondary claim.
Generating Secondary Claims
After reviewing the transactions and adjustment information:
- Select the transaction(s) you would like to process.
- Review the adjustment Reason Codes and Amounts.
- Add or remove adjustment rows as necessary.
- Click Generate Secondary Claim(s).
- Continue through the normal claim-generation process.
MeasurePM will include the applicable adjustment information when creating the secondary claim.
Export Secondary Claim Information
Click Export to Excel to export the Secondary Claims grid.
The Excel file will include the applicable adjustment columns, including additional Reason Codes and Amounts entered for the claims.
This ensures that the adjustment information in the export reflects the information displayed in MeasurePM.
Need Help?
If you have any questions or need assistance, please reach out to our support team at support@measurepm.com