Overview
This guide was developed to provide MeasurePM users with an overview of how to create new programs in their site's Program Library. Programs can only be created on the Web. However, they can be mapped (i.e., added) to client profiles and configured at the client level on both the Web and Mobile-App. Modifications to program configurations from the client level will sync to the server upon saving, meaning the updated program configurations will be reflected on both the Web and Mobile-App. Please note that the creation of new programs is permission based, which means only authorized individuals from your facility will have this ability.
Relevant Program/Goal Library Permissions
There are two separate permissions that will grant access to the Program Library. The first, Clinical Settings- Program Library will allow authorized users to view but, but not edit, programs/goals in your facility’s program library.

The second permission, Clinical Settings- Save Edit Programs, will allow authorized users to access, create, edit, and delete programs/goals in your facility’s program library.

Note that this does not give permission to editing programs at the client level, it is only allowing editing at the program library level. Please see the Clinical Permissions Guide for more details on permissions.
Creating Programs on the Web-App
if relevant permission is granted, users can create programs on the Web via the Program/Goal Library accessed through the Clinical Settings in the blue left hand navigation bar. Upon selecting Program/Goal Library, all existing programs will be displayed. To create a new program, select the blue “+Add Program” button on the top right of the page.

Once this button is selected, a Program popup window will be displayed. The fields indicated by a “ * ” require added information/selection in order to successfully save the program. Note that any two programs cannot be identically named, meaning that users are unable to save a program with a name of an already existing program.
The “Copy From” feature allows users to copy the configurations from an already existing program. To use this feature, select the dropdown menu, which displays all existing programs housed in the Program Library. Once a program has been selected from the drop-down menu, all configurations and settings from the copied program will appear in the current program window. If users do no want to use the Copy From feature, as it is optional, the first step is to select the Skill Area/Domain from the first drop down menu.
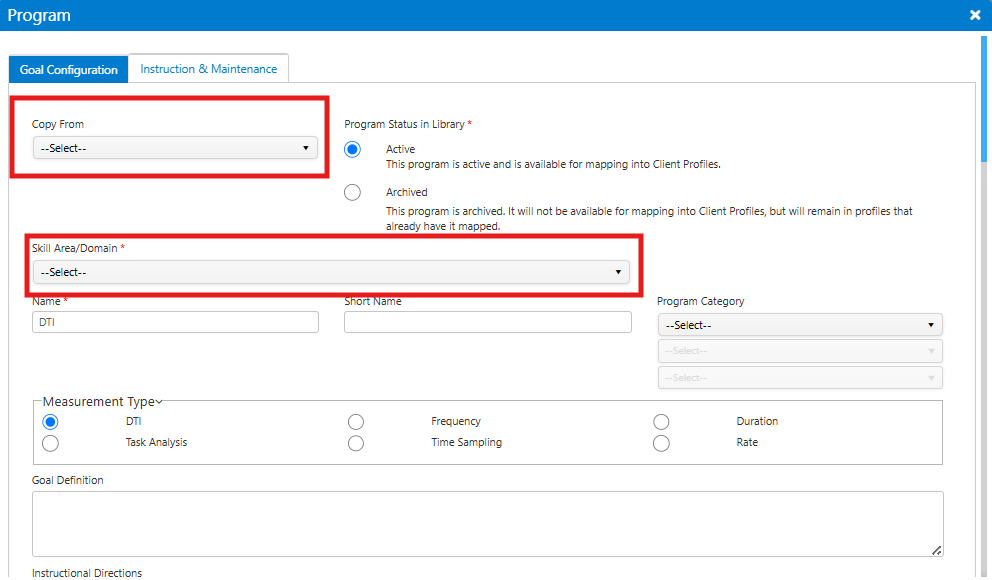
The options available in this menu are based on the skill areas/domains created in the Skill Area/Domain section of Clinical Settings. At least one skill area or domain must be set up prior to adding programs to the Program Library.

Once the skill area/domain has been selected and the program name has been created, the user can proceed to make a Measurement Type selection. Program configuration options will depend upon the selected measurement type.
Measurement Types
Users must select the most appropriate measurement type for the program they are creating. The available measurement types include: DTI, Frequency, Duration, Task Analysis, Time Sampling and Rate. Note, DTI is selected by default.

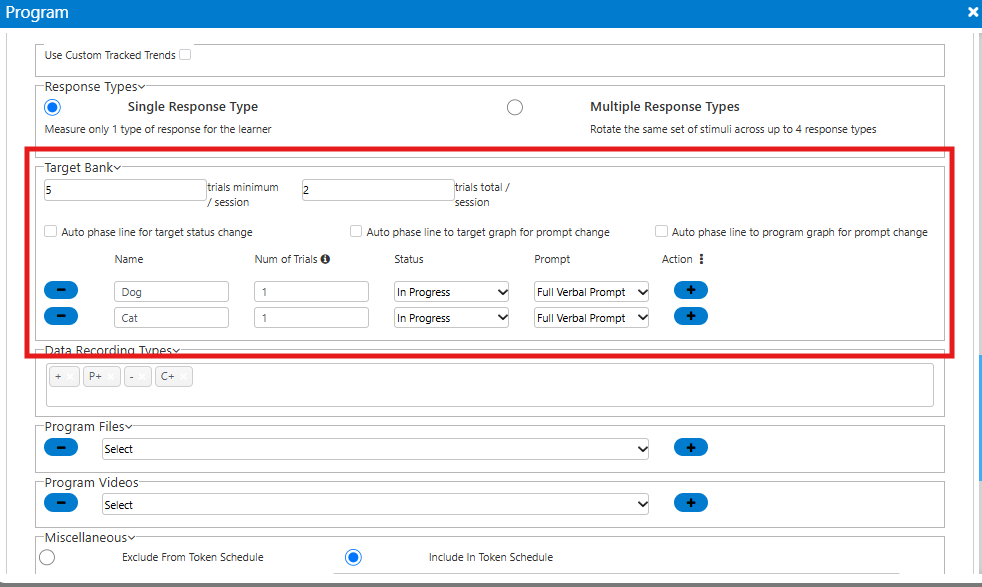
Trial Count
When DTI is selected, the Target Bank displays trial settings per individual target rather than for the entire program. The user will first add the minimum number of trials per session and the total number of trials per session. When adding in new targets, the user will add in the number of trials, the status of the target, and assign a prompt level. To note, the user will have to put the target into an initiated status such as (in progress or baseline) in order to add the number of trials per target.
Goal Definition
In this text box, users have the option to include program specific goals. Note that there is no red asterisk beside the field name, indicating it is not a required field. Goal definitions can be created for all Measurement Types/Programs. 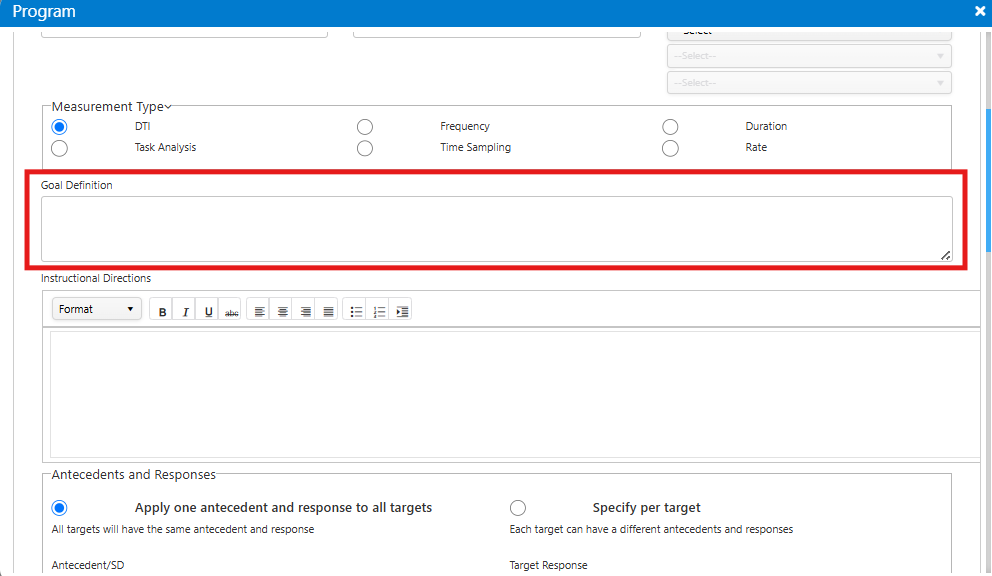
Instructional Directions
In this text box, users can include any relevant instructional directions and additional information for providers to follow. An example would be: “Using picture cards, present the learner with one picture/image at a time. If the learner says the correct name, deliver praise and one token. If the learner does not say the correct name, or does not provide a response within 3 seconds, model the correct response and prompt them to repeat it.” Instructional directions can be created for all Measurement Types/Programs. 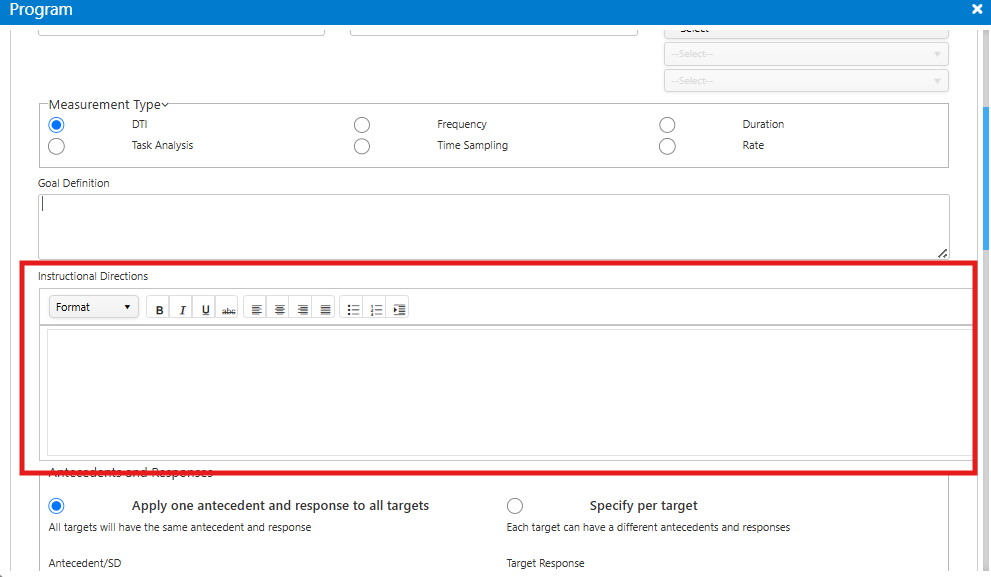
Antecedents and Responses
In this section users have the option to apply a single antecedent and response to all targets or can specify the antecedent and response if it varies across targets. If the first option is selected, users can input the antecedent and target response in the appropriate text boxes. 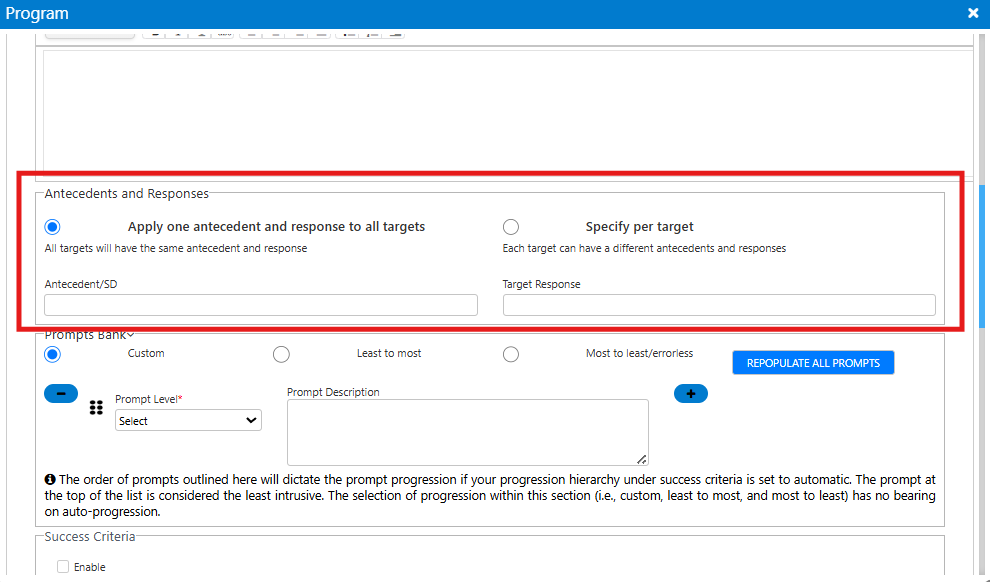
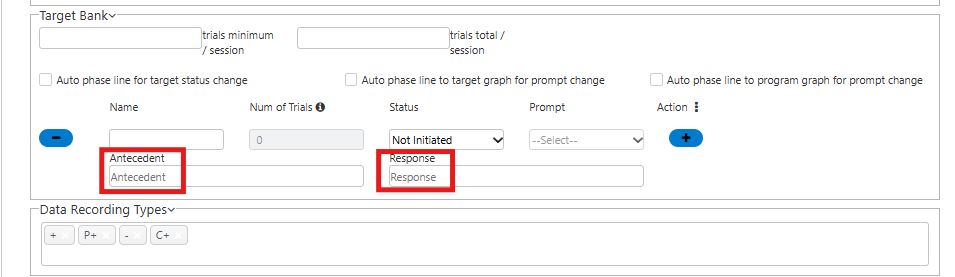
If opting to specific per target, users will see an additional text boxes appear below the targets in the Target Bank to indicate a unique antecedent and a response for each target.

The Antecedents and Responses section is a configurable option across all measurement types, however, with Task Analysis it can only be configured to have a single Antecedent and Target response per program.
Prompts Bank
Within the Prompt Bank, users are given 3 options: (i) Custom, (ii) Least to Most, and (iii) Most to Least/Errorless. Note that this is just an indication for users/providers of the intended teaching strategy/prompt progression. When the “Repopulate All Prompts” button is selected, all prompts set up in the Clinical Settings will be populated and users can then remove any unwanted prompts if needed.

The options in the drop-down menu correspond to the prompts created within Clinical Settings as shown below. Note that the user cannot create a new prompt (i.e., a prompt that does not exist in Clinical Settings) when configuring programs.

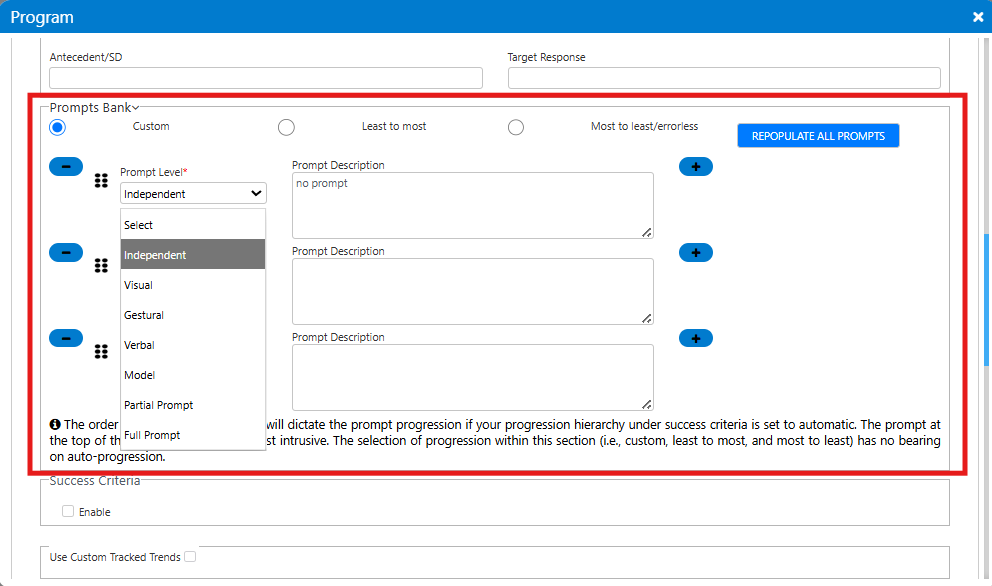
After selecting a prompt from the drop-down, the user can enter a prompt description in the text box to the right. A description may auto-populate when selecting the prompt if there was a description set up in Clinical Settings. However, this prompt is editable on the program level.
To add and remove prompts, simply select the minus or plus icon located to the left and right of the prompts respectively. The prompts available in the drop-down menu are only those which have been added to the Prompt Bank. The prompt selected will act as the starting prompt for the program.

Success Criteria
Success criteria (i.e., mastery criteria) is a measurement of mastery (e.g., 80% correct across 2 consecutive sessions). To start to configure, enable must be selected. If enable is not selected, success criteria will not be triggered in your data.
When configuring, the first choice to make is if you would like to use Manual or Automatic Criteria. To understand the difference between the 2, simply select the "i" icon next to the Progression Type header.

With Manual or Automatic detection you can have it detected on a per program or per target basis and there are certain action items that can occur for each.
| Manual | Automatic | |
| Per Program vs Per Target |
|
|
| Action Items |
|
Note: Lock and Phase Line are not available for automatic. Rather than using these options, you can set action items within configurations to occur when configurations are met. |
| Configurations | If Manual is selected, you can adjust the pass value and/or value type for the program. The Two different criteria's can be configured to be detected at once (i.e., primary and secondary criteria). For example, I may configure my primary criteria as 90% correct across 2 appointments, and my secondary as 100% correct across 1 appointment. You can also add additional contextual information for clinicians (i.e., indicating People and Environment) in their respective sections. | If Automatic is selected, you can adjust the criteria and action items per active status basis. For example, I may configure my Baseline criteria such that if the data reaches 90% correct across 2 appointments, the target will automatically move to mastered status, but if the data is below 90% across 2 appointments, the target will automatically move to In Progress status. Automated phase lines can be added to the graph when these action items occur as well, they are just configured within target configuration rather than success criteria. |
| Commonalities in configurations |
| |
| To learn more about each of these, please see the following guides | Success Criteria- Manual Progression | Success Criteria - Auto Progression |


Note, success criteria configurations made to programs in the Program Library can be modified at the client level after mapping programs to a Client Clinical Profile.
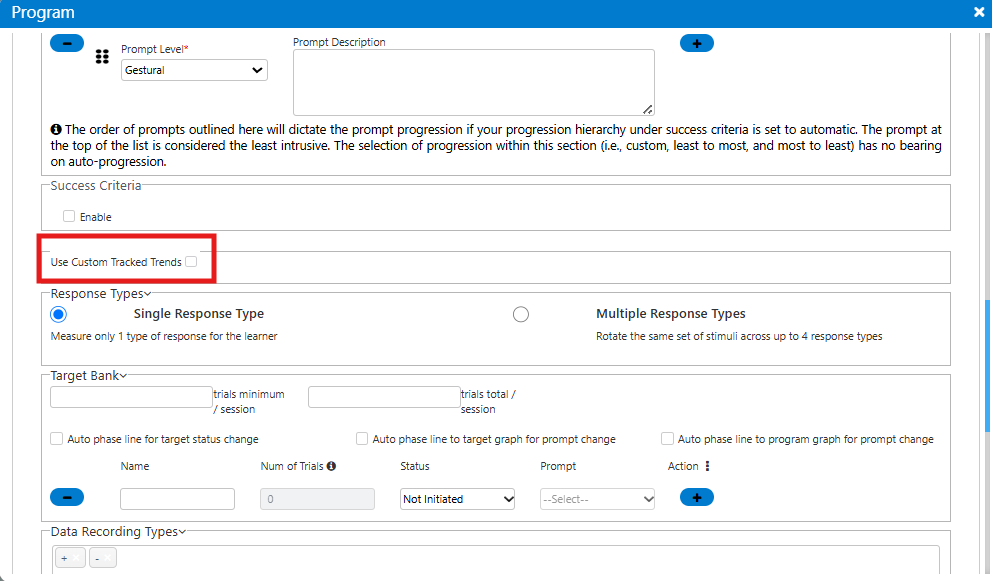
Custom Tracked Trends
To use custom tracked trends, users must select the “Use Custom Tracked Trends” checkbox. Note, tracked trends are only available for DTI and Task Analysis programs.
The default trends established in Clinical Settings will auto populate once the checkbox is selected. However, users can remove or add any additional trends by using the plus and minus icons. Once a trend is added, users have the option to configure the following trend action items:

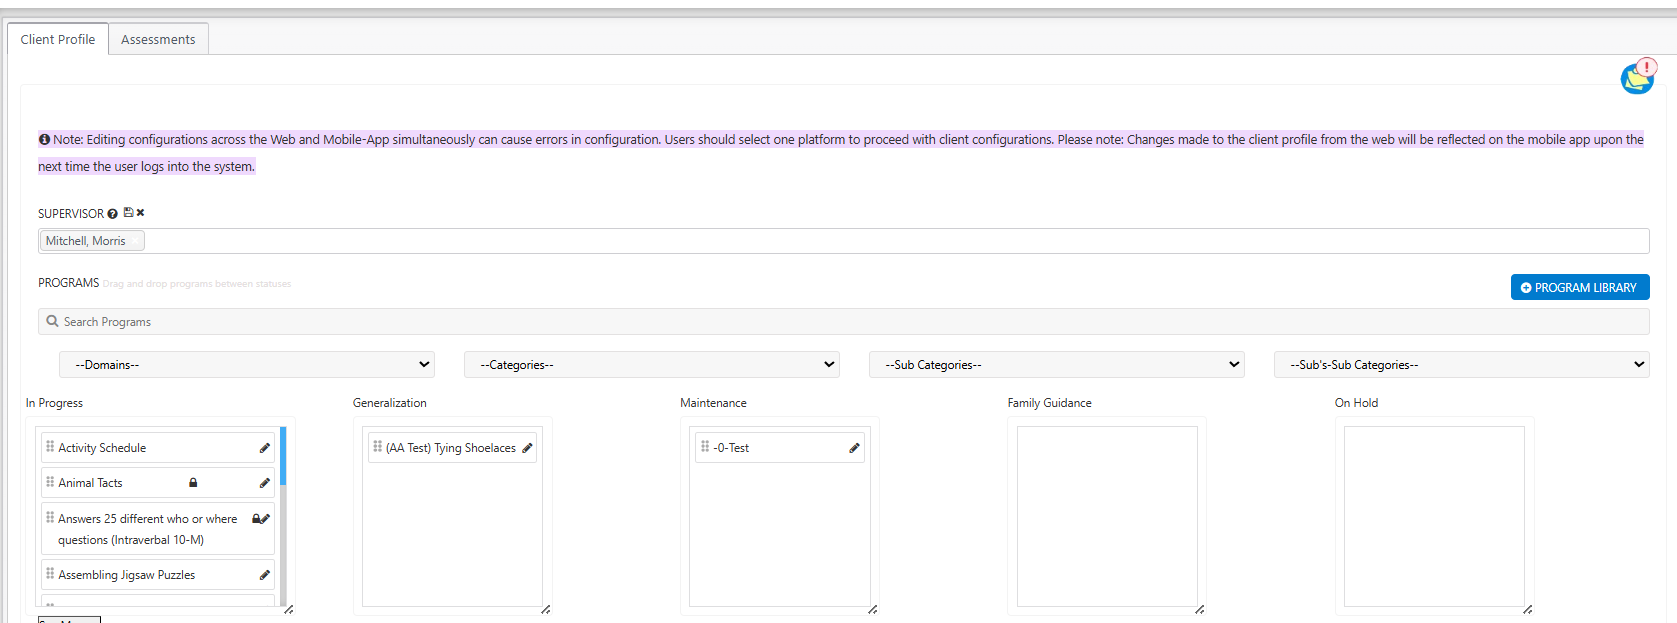
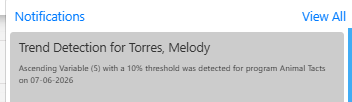
- Notify Supervisor: The supervisor designated in the Supervisor section of the clinical profile will receive a notification of trend detection. The notification will appear in the bell icon on the Web and Mobile-App. Below are examples of the notification on the web and mobile-app!

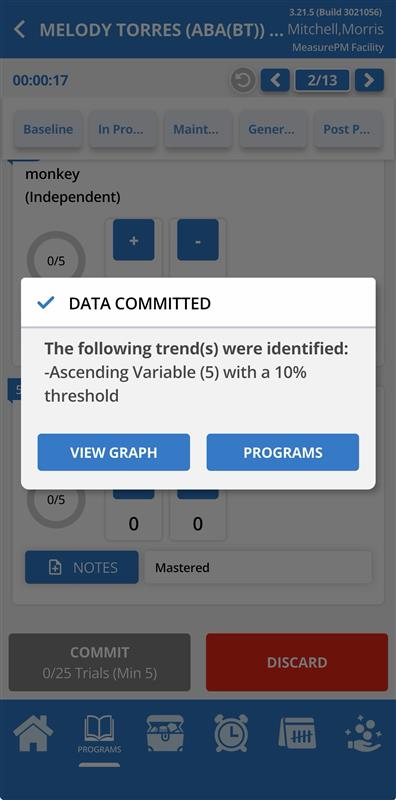
- Commit Alert: The user running the appointment on the Mobile-App will be notified of detection after committing the data.
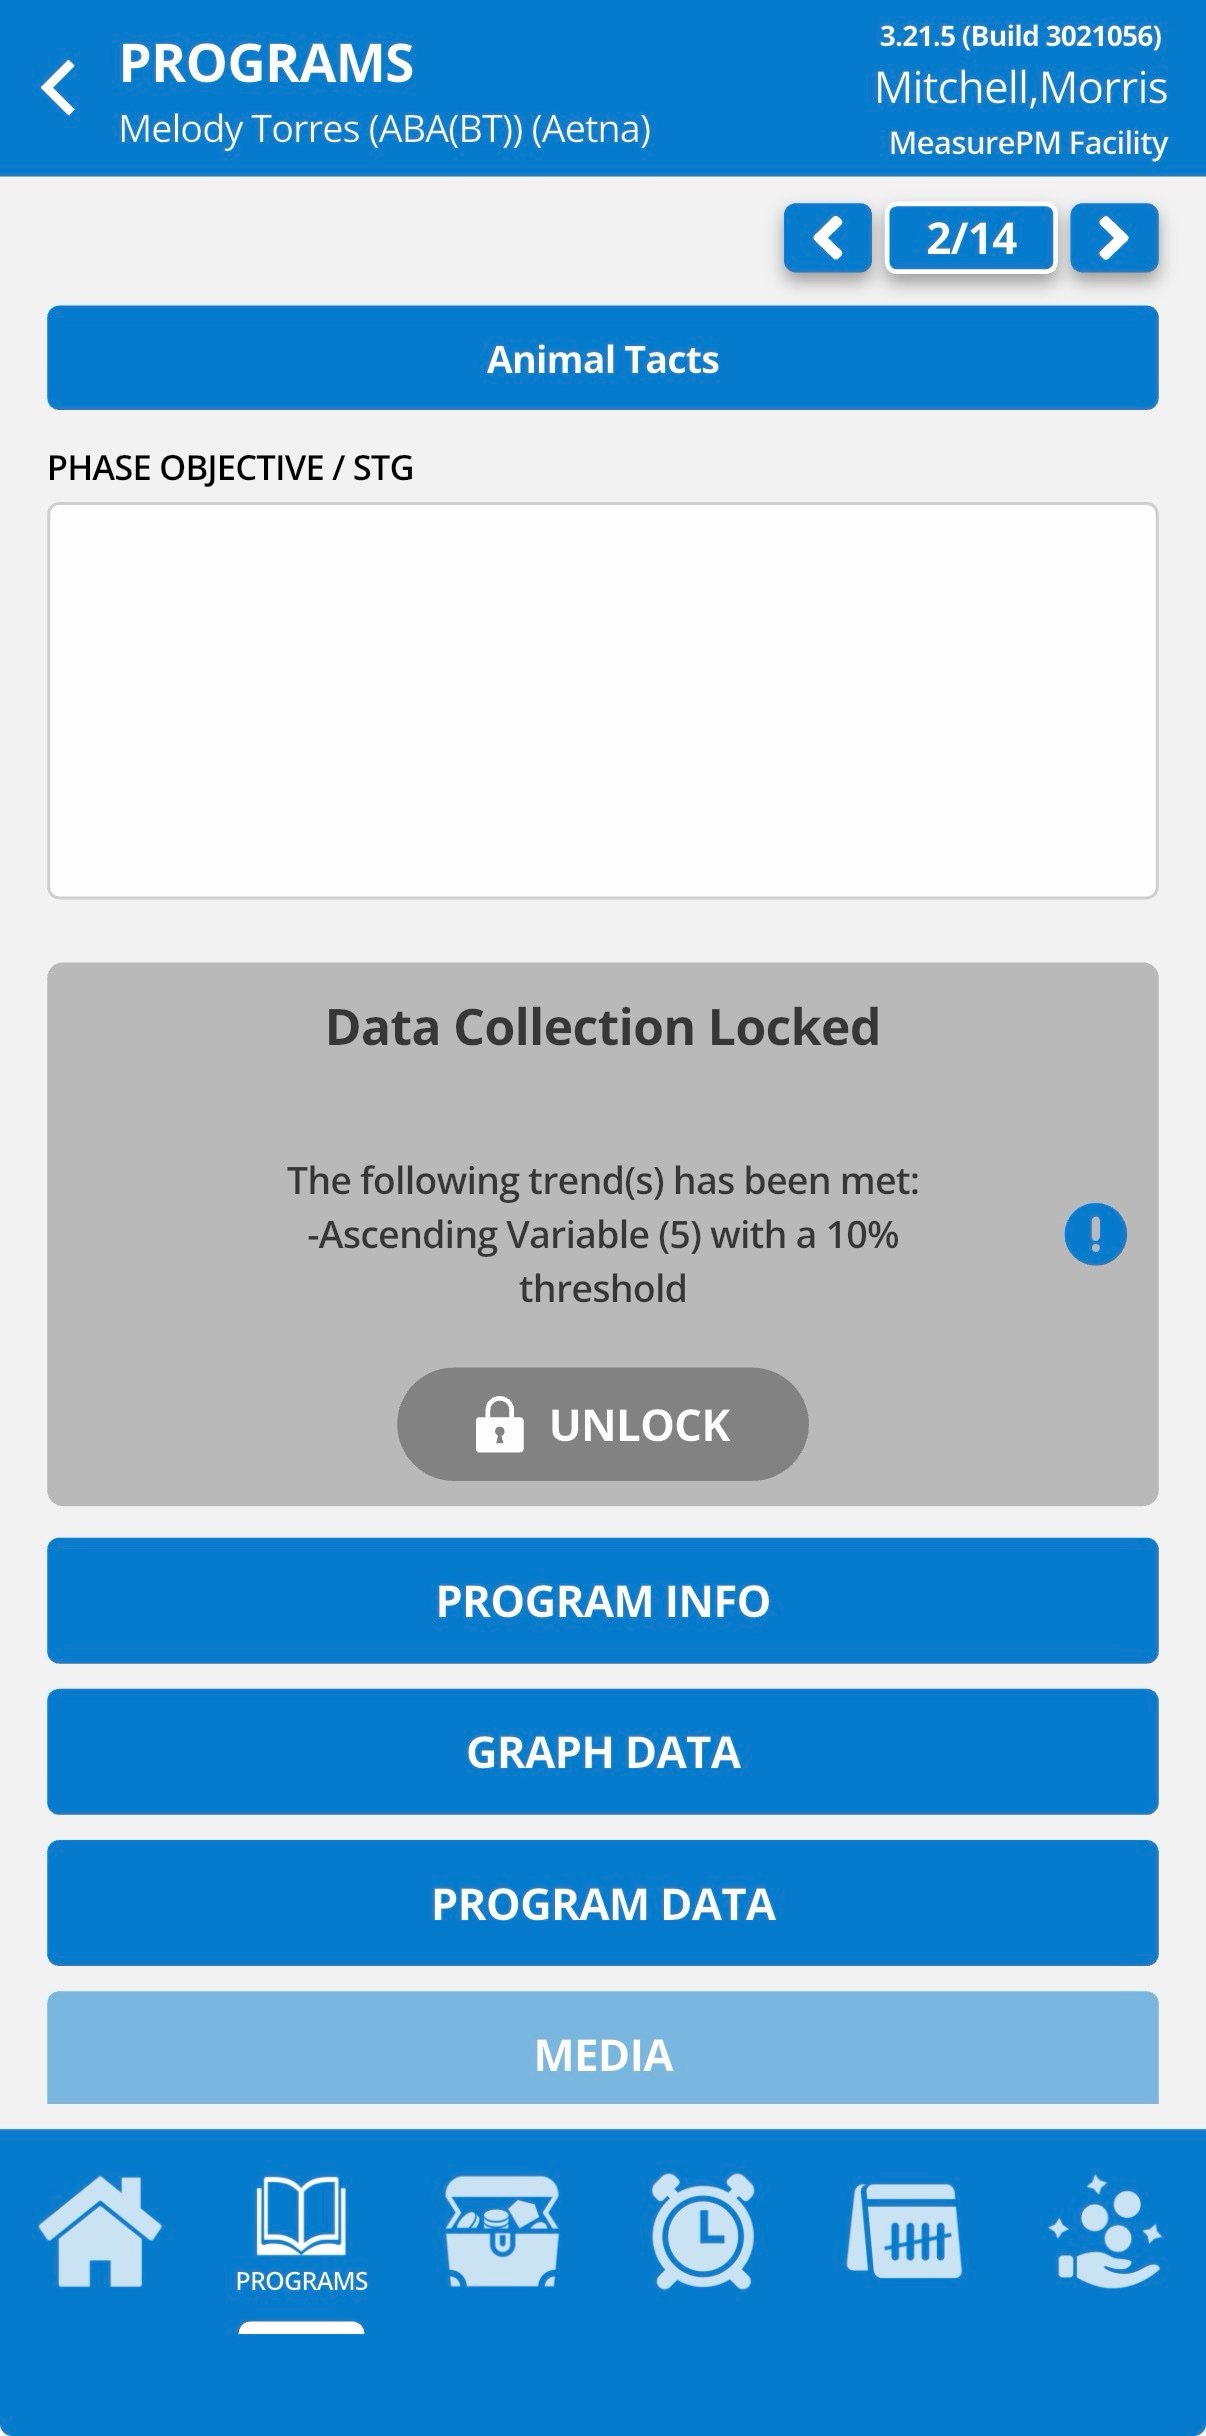
- Lock: Data collection for the program will be temporarily paused, and staff cannot resume data collection until a user with related permission unlocks the program.
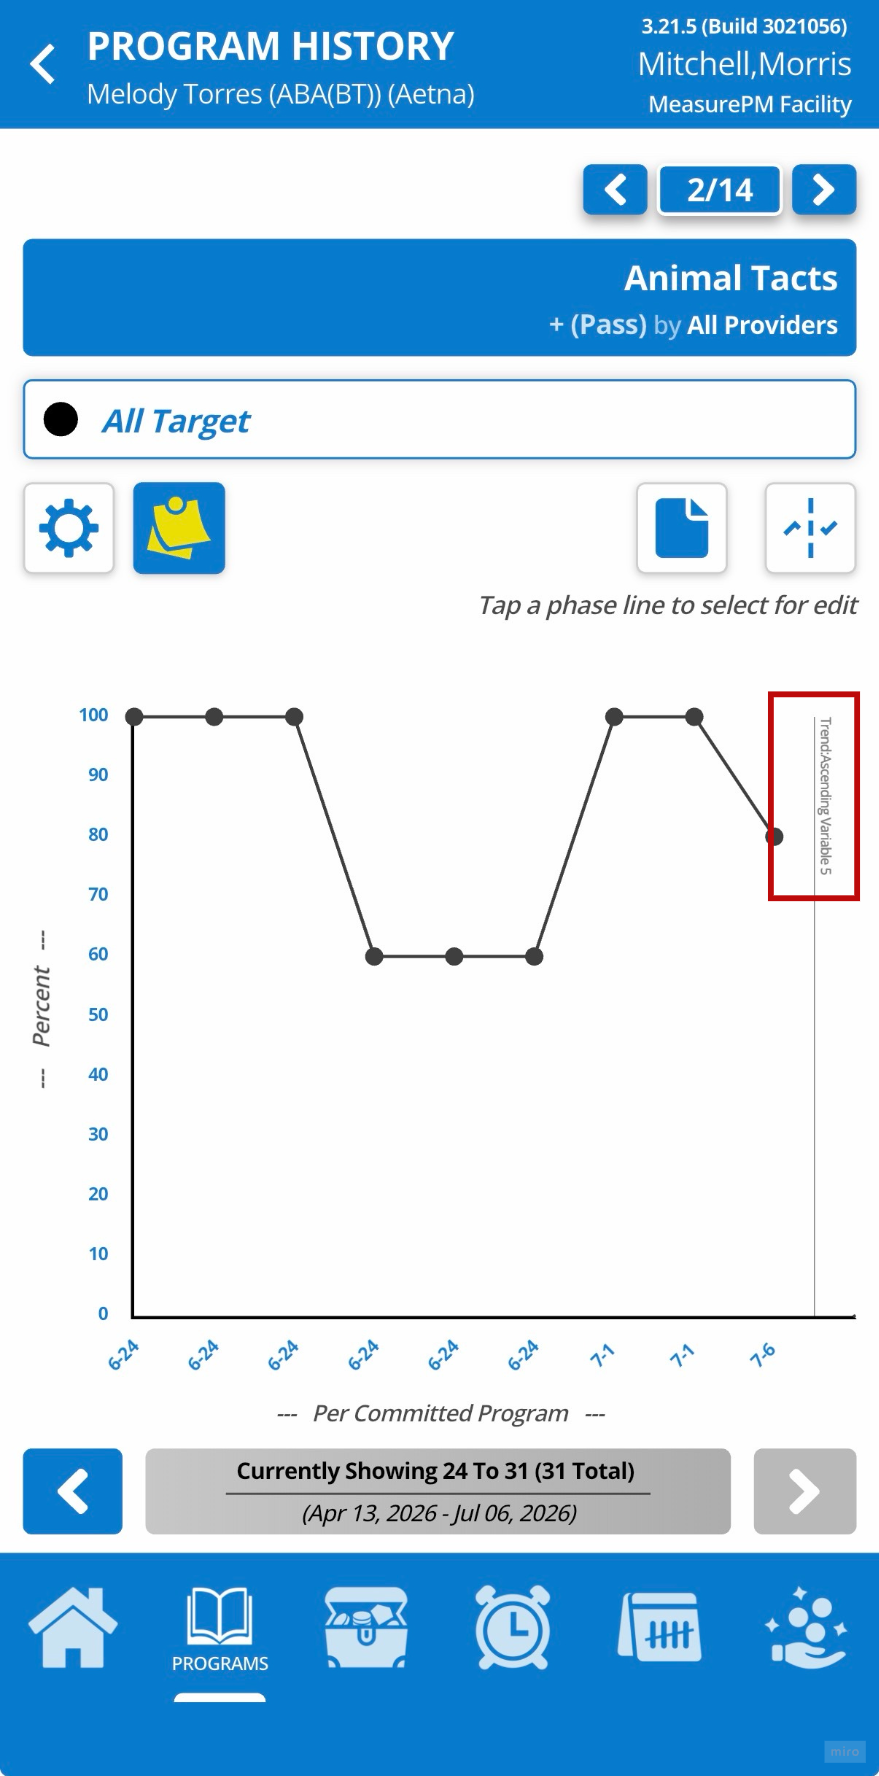
- Phase Line: A phase line with the trend name and threshold value will automatically be added to Web and Mobile-App graphs after detection.
Note, custom tracked trend configurations made to programs in the Program Library are optional and can later be modified at the client level after mapping programs to a Client Clinical Profile.
Response Types
Response types as a program configuration option are helpful when employing multiple operant conditioning/training to teach a specific skill. The default setting for response types is single. When the program is configured to a single response type, the user will not be able to specify what the response type is. However, users have the option to configure multiple response types.
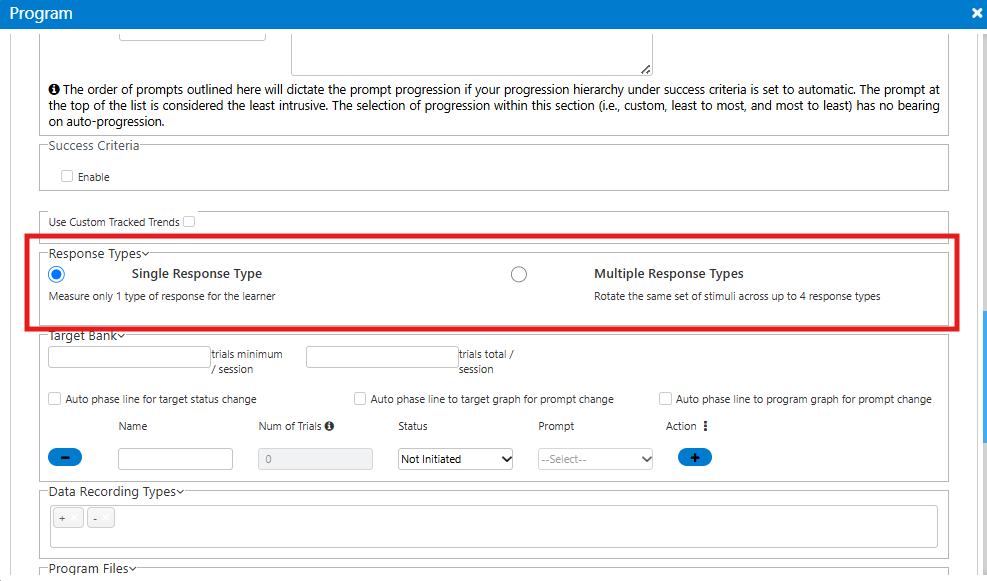
Once “Multiple Response Types” has been selected, a text box will appear directly underneath. Users can name each response type and add up 4 different responses. All In Progress or Maintenance status targets will rotate across the configured response types. For instance, if Response 1 = tacting, and Response 2 = matching to sample, and target 1= dog and target 2= cat; the following will be displayed on the data collection screen from the Mobile App: (1) tacting – dog, (2) tacting – cat, (3) matching to sample – dog, and (4) matching to sample – cat. To add or remove response types, simply use the “+” and “-” buttons on the right and left of the text box respectively. Note that the system will not allow users to leave a response type text box blank when attempting to save the program.

Response types as a program component are available for DTI, Frequency, Duration and Rate based programs.
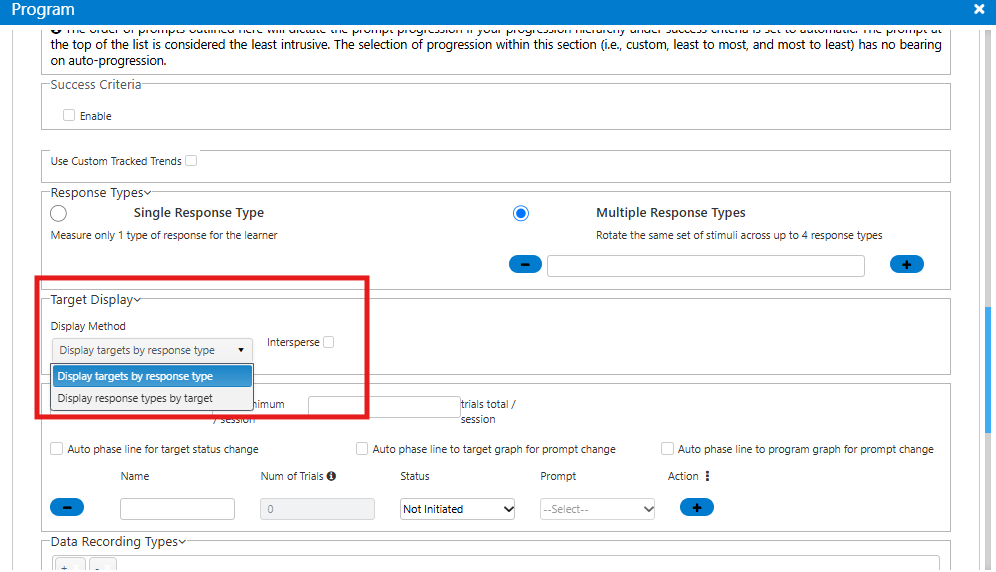
Target Display
The Target Display section will only appear when the user selects the "Multiple Response Types" checkbox. In this section, users can decide whether to display targets by response type or display response types by target, giving the user two options for organizing data collection on the App. The intersperse checkbox results in a randomized order of targets from the Mobile-App data collection screen.
Target Bank
The target bank is available for the following measurement types: DTI, Frequency, Duration, Rate and Time Sampling. A minimum of one target must be configured here, however, at the client level, further configurations or additions can be made. To add a new target here, select the “+” icon and type the name of the target in the text box that appears. To remove a target, simply select the “-” icon.

Target status and Prompt level can be configured at the library level. As well as, configuring the number of trials per individual target which will automatically adjust into the total number of trials for the program. To do so, select a status and/or any prompt from the available options in the dropdown menu. Note, for time sampling targets, only one target can be given any of the following statuses: Baseline, In Progress, Maintenance, Generalization, and Post Probe. This is because data can only be collected for target from the Mobile-App.

Automated Phase Lines

When configuring targets, you can opt to have automated phase lines added to your graph when certain actions occur. There are 3 different types of phase lines that can be added:
- Auto phase line for target status change: If chosen, an automated phase line will be automatically added to the individual target graph when a status change occurs with the status name. E.g., the label may say "In Progress" or "Maintenance". This line will only show when filtering by individual targets, it will not show when looking at the program graph (i.e., when filtering by "all" targets).
- Auto phase line to target graph for prompt change: If chosen, an automated phase line will be automatically added to the individual target graph when a prompt change occurs with the prompt name. E.g., the label may say "Full Physical" or "Verbal". This line will only show when filtering by individual targets, it will not show when looking at the program graph (i.e., when filtering by "all" targets).
- Auto phase line to program graph for prompt change: If chosen, an automated phase line will be automatically added to the program graph when a prompt change occurs. All prompt names will show when the line is populated. E.g., the label may say "Full Physical, Verbal, Gesture" or "Full Physical". This line will only show when filtering by "all" targets, it will not show when looking at individual target graphs (i.e., when filtering by specific targets).
Data Recording Types
When a new program is created, any data recording types that appear automatically are the default data recording types which have been set up in Clinical Settings.
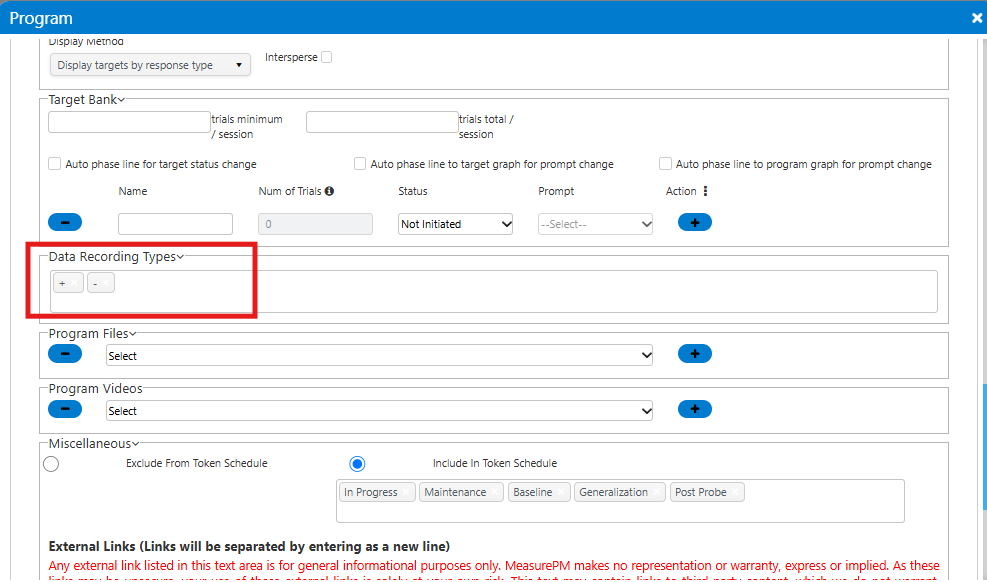
To add or remove data recording types, select the window and a dropdown menu will appear with all possible selections. Selections which appear here are those that have been created in Clinical Settings. Note that users cannot add an entirely new data recording type that does not exist in Clinical Settings. Once a data recording type is selected, it will be shaded in orange in the dropdown menu. To remove any unwanted data recording types, select the “x” on the specific ones that need to be discarded. Note that removing them from the data recording type box does not remove them as a selectable option should users choose to reintroduce them.

Data recording types is a configurable option for DTI, Frequency, Task Analysis, and Rate programs.
Task Steps
If a program is configured as a Task Analysis, users will configure Task Steps rather than Targets. To do so, users will select the “Task Steps” tab from the top of the Program configuration window. Task Steps will be unavailable unless the program is configured as Task Analysis.

Once here, users can select a chaining procedure from the Chaining Procedure dropdown. Options include Forward Chaining, Backward Chaining, and Total Chain.

To add steps, select the “+” and to remove steps select the “-”. Users can list/describe each step in its own "Step" text box, followed by selecting the step status and the step's associated prompt level. Only prompts set up under the Goal Configuration tab will be available for selection. Once the prompt level is selected, users have the option to add, edit or delete the description. Note that if prompt descriptions were set up within Clinical Settings, it will populate here once a prompt is selected. To the right of the prompts are two checkboxes: (i) “In Progress”, and (ii) “Required”. If the “In Progress” checkbox is selected, the step will be displayed on the Mobile-App's data collection screen and users will be able to record data for these steps. The “Required” checkbox makes it so data for the step must be recorded in order to commit the data. If this checkbox is not selected, users will not have to record data for the step to commit the program data. Instead, it will be optional.

Program Files
Here, users can attach files to programs. To add a file, first select the “+” button, followed by dropdown menu to select the applicable file. All files available for selection are PDF files, which would have been uploaded via the Files tab in the blue navigation bar to the right. Any file added here will also be accessible from the Mobile-App.

Program Videos
Here, users can attach videos to programs. To add a video, first select the “+” button then use the dropdown menu to select the applicable video. All videos available for selection are videos uploaded as .mp4 via the Video tab in the blue navigation bar to the right.

Exclude/Include Token Schedule
In the settings of the token board on the Mobile-App, users can configure a reinforcement schedule. The Mobile-App will automatically notify users when they have reached the threshold for reinforcement based on their program data collection.

To exclude/prevent a program from interacting with the Token Board, select the “Exclude from Token Schedule” radio button. 
To include the program in the Token Board's reinforcement schedule, select the "Include in Token Schedule" radio button. From here, determine which target statuses are to be detected by the Token board. For example, you may only want In Progress and Maintenance targets to interact with the token board. 
Token Board configurations are only applicable to the following measurement types: DTI, Frequency, Rate and Task Analysis.
External Links
Adding external links to a program can be done in this section. Simply paste the link into the text box; if adding multiple links, they should be added as separate lines. Any link added here will be available to copy/paste from the configuration page on the Mobile-App.

Please note, any external link listed in this text area is for general informational purposes only. MeasurePM makes no representation or warranty, express or implied. As these links may be unsecure, your use of these external links is solely at your own risk. This text may contain links to third party content, which we do not warrant, endorse, or assume liability for.
References
Any text is supported in the References section. This reference will be viewable at the client level in the profile on the Web and Mobile-App, and will be available for all Measurement Types.

Instruction and Maintenance
Users have the option to add additional programming information, including prerequisite skills, next steps, and programs that may be incidentally acquired. To include this information, users must select the “Instruction and Maintenance” tab found at the top of the programming window. This tab is accessible for all programming types (i.e., DTI, Frequency, Duration, Task Analysis, Rate and Time Sampling).

Once this is filled out, this information is viewable as a hover box when mapping programs to a profile from the Program Library and hovering over programs from the Client Clinical Profile, and also from within a program on the client profile. To access from within a program, select the info icon beside the program name and a pop up with the information will occur.


Save or Cancel
Once the program configurations are finalized, select the “Save” button at the bottom right of the window. This will ensure that the program is saved and logged into the Program Library. If the program is not saved (i.e., the “x” or “Cancel” is selected) the program will be discarded, and the changes will not be recoverable.

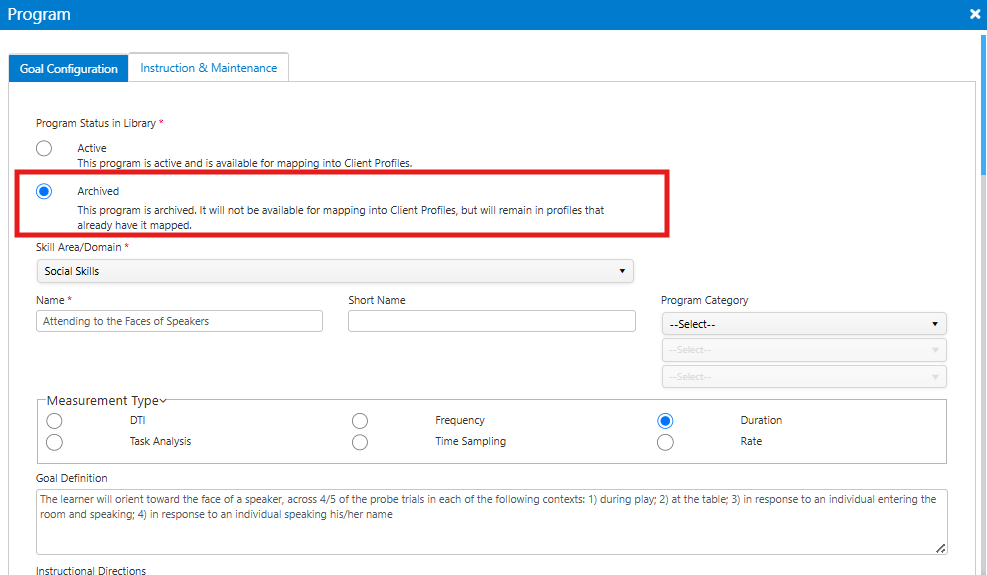
Once it is saved, it will appear in the facility's Program Library. The user can go back and edit it at any time or delete it as long as it is not mapped to a client profile. Once it is mapped, there is no way to remove it entirely from the library, however the user can inactivate it, meaning it will no longer be available for mapping to new client profiles. To inactivate a program simply select the “Archived” radio button at the top of the window followed by the “Save” button. Once this is done, the program will have an “Archived” Status displayed in the Program Library.

Reminders
- Only users with applicable permissions will be able to access the Program Library.
- Users must save any changes made by selecting the blue “Save” button at the bottom right of the program window.
- To create programs to add to the Program Library, the user must first set up all relevant settings under the Clinical Settings page, including Data Recording Type and Prompt Levels.
- Further configurations can be made from the Client Clinical Profile once the program has been mapped/added to the profile.
For any additional questions or concerns please reach out to support@measurepm.com.