MeasurePM offers various Measurement Types for configuring instructional programs. Each type is linked to specific program settings and features a unique data collection interface. Refer to the information below to understand the use of Task Analysis as a Measurement Type.
Task Analysis Program Configuration
Program Library
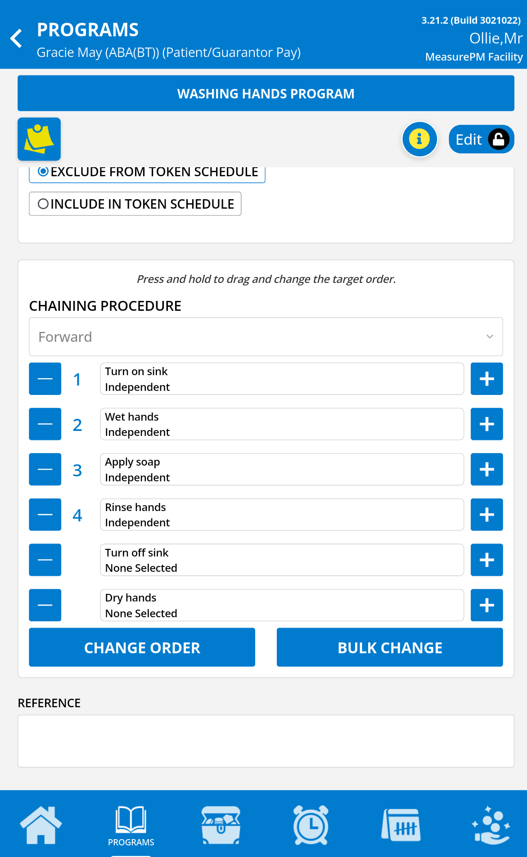
Similar to any other program Measurement Type, Task Analysis programs are first set up in the Program/Goal Library. Please note that adding and editing programs in the library is permission-based, meaning only authorized users will have access to do so. To change an existing program in the library to Task Analysis, or to create a new Task Analysis program, select “Task Analysis” from the Measurement Type selection box. The rest of the pop-up will provide fields applicable to the chosen measurement type and a secondary tab titled Task Steps will become available.

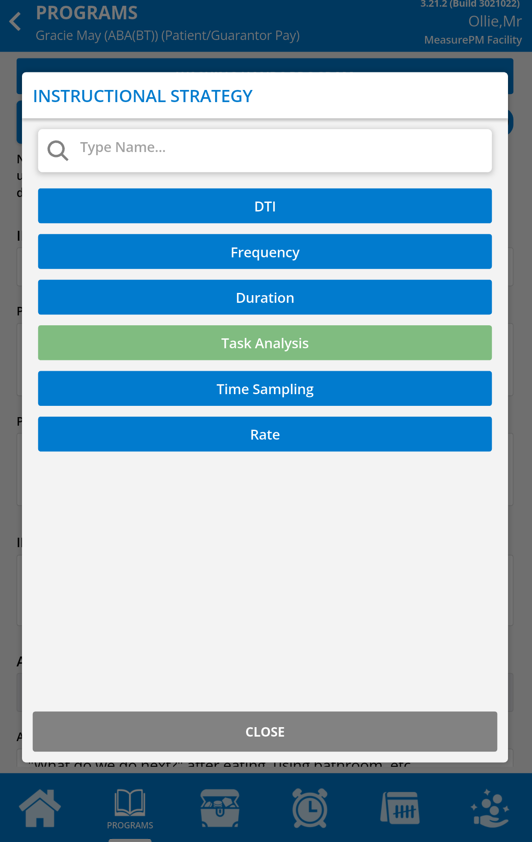
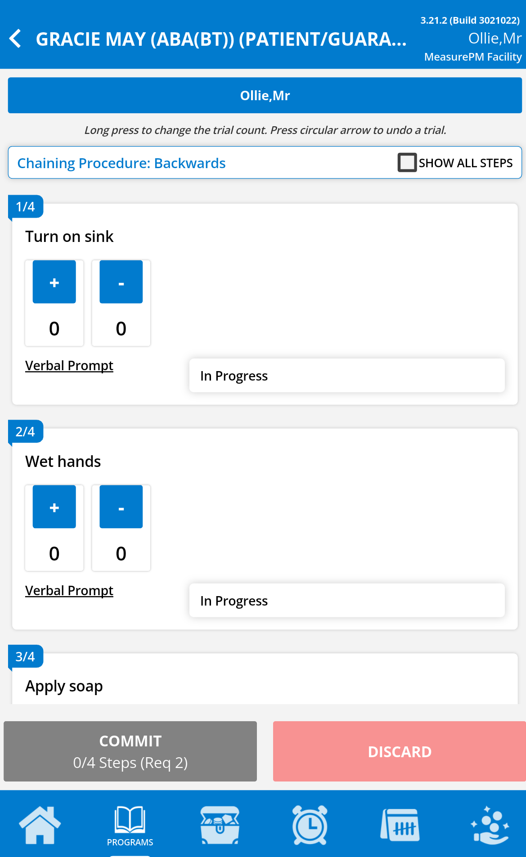
Under the task step tab, users can define individual steps including entering a task name (e.g., gather materials, spread peanut butter, etc.), selecting the step status, choosing a prompt per step, and entering a prompt description for each step. Additionally, users can mark steps as "Required" or optional by toggling a checkbox. Required meaning that this task step is required when taking data on the mobile-app. Required is only available for steps that have check that are assigned to an active status. MPM also allows users to indicate the intended chaining procedure between backwards, forwards, or total task chaining. In the example shown below, forward chaining is chosen.

Client Clinical Profile
When a Task Analysis program is mapped to a Client Clinical Profile, or when editing a Task Analysis program in a profile, the configurable options will primarily be the same as in the Program Library. A key section within the configurations is the Task Analysis steps. First enter the step name, then set the status. For the step to be available for data collection it will need to be assigned to an active status, which includes Baseline, In Progress, Maintenance, Generalization, and Post-Probe. Next, assign a prompt level per step, and optionally a prompt description. Only the prompts assigned to the program will be selectable here. Finally, you can decide if you would like the step to be required for data collection or not. The required check box is only applicable if you have assigned the step to an active status. If the required checkbox is left unselected it is indicating data collection on the step is optional, and if required, it is mandatory to collect data on the step to be eligible to commit.

Mobile-App
In addition to being able to configure programs on the Web, users can also configure programs at the client level on the Mobile-App.
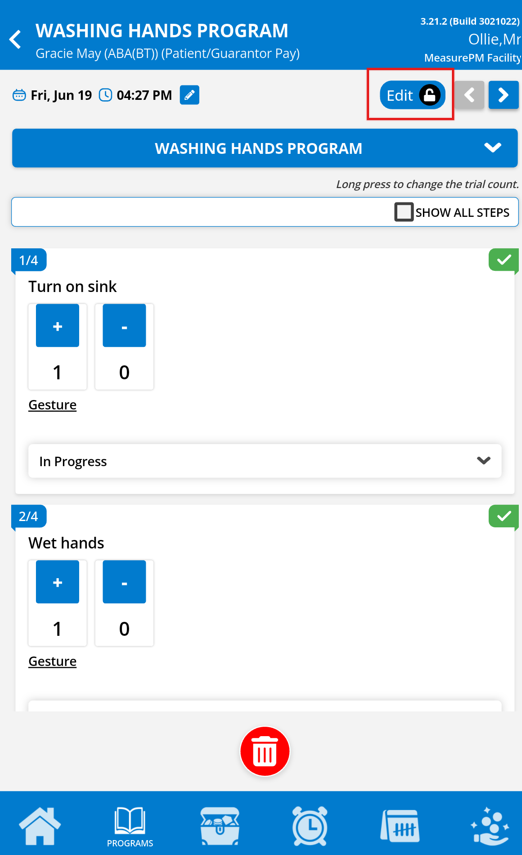
To do this, select the program of interest from the View All list, and from the individual program menu, select Program Info. This will open the configuration page. Please note, editing program information on the Mobile-App is also permission based, and only authorized individuals will have permission to do so. If the user has the permission, they can select the lock icon in the top right-hand corner to unlock editing and proceed with making changes.
 |  |
Task Analysis on Data Collection Page
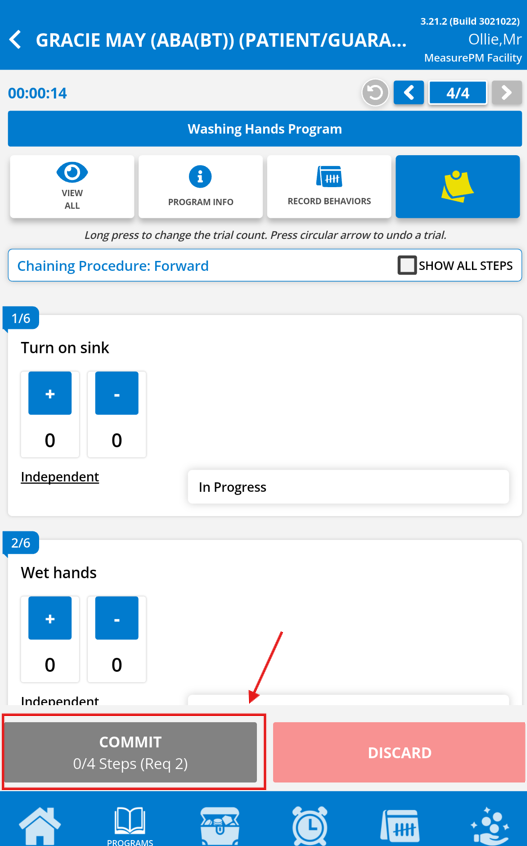
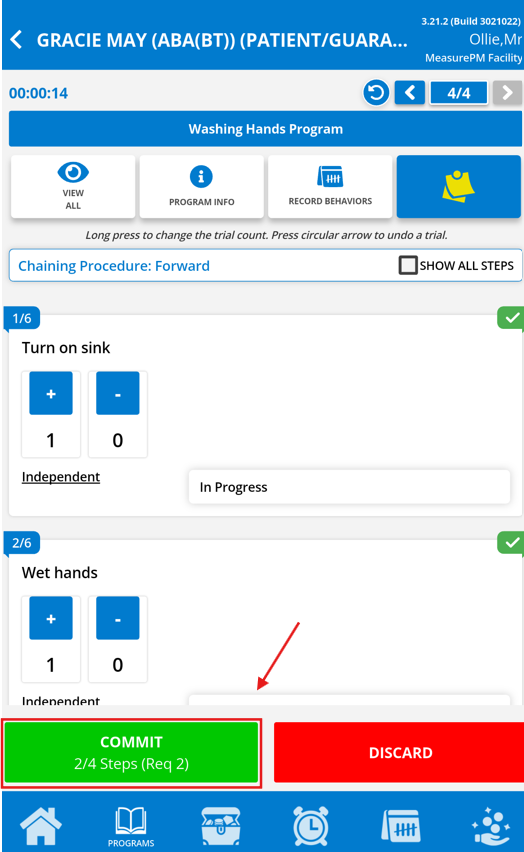
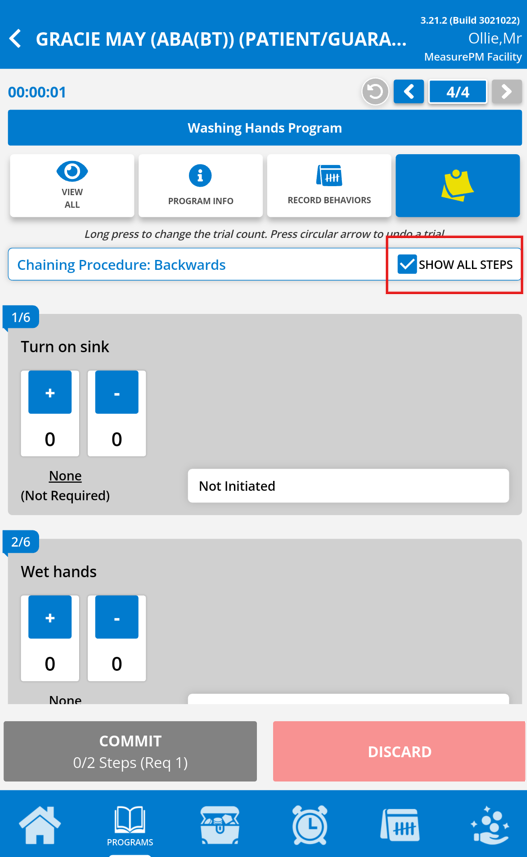
When in an active appointment, and collecting data, Task Analysis programs will appear as in the image below. Each active step will appear on the recording screen in sequential order. Note that you are only eligible to record data on the active steps, but should you want to see all steps in the chain you can select the "Show All Steps" checkbox. With each step you will see the step name, the prompt level, the status, and the data recording types (the blue squares). To record data on a step, simply select the relevant data recording type. Please be aware that data can only be recorded once per step before committing, and the data recording types are site specific and may differ from the example image.
The commit button at the bottom of the page indicates progress, showing the number of completed steps out of the total active. Once all required steps have been scored, the data will be eligible to be committed. To commit you can either select the commit button from the data recording screen, or commit upon rendering your session.
 |  |  |
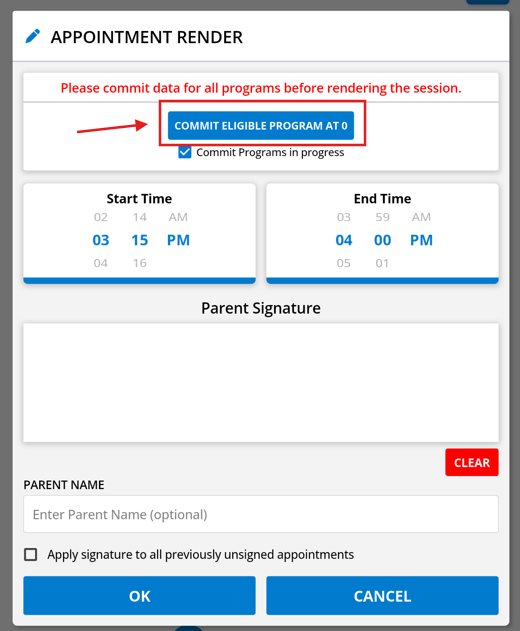
Upon rendering you will have the option to commit all in progress programs, which will include Task Analysis programs.
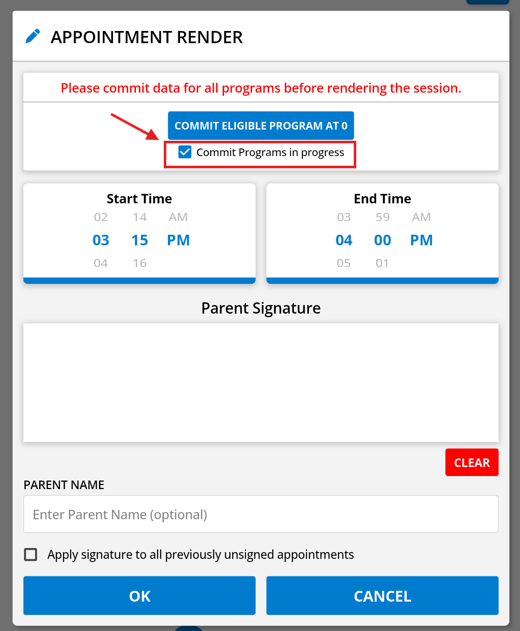
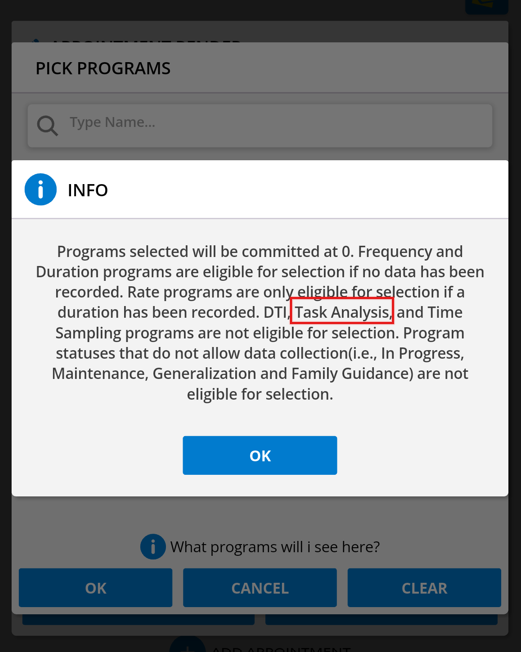
You will also have the option of committing eligible programs at 0, however Task Analysis programs do not meet this eligibility requirement and are excluded from the selection.
 |  |
Task Analysis Success Criteria
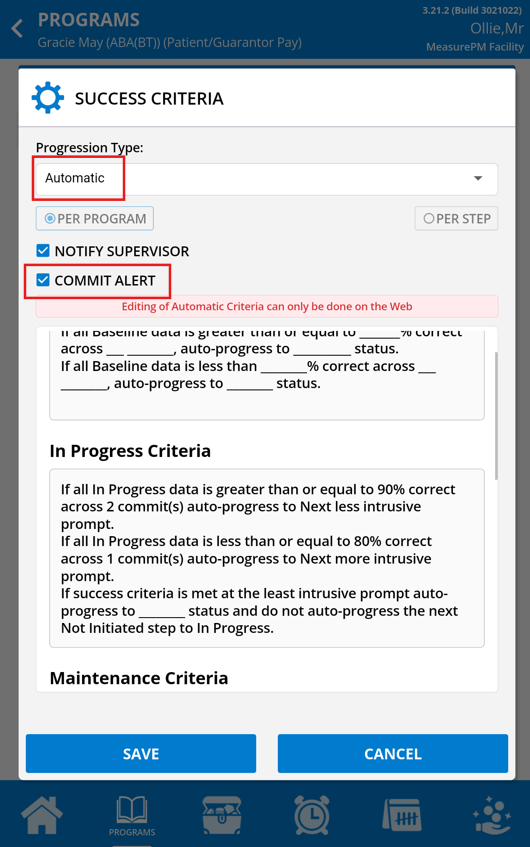
You can configure manual success criteria on both the Web and Mobile-App, and you can configure automatic criteria across Web only.
When configuring success criteria for a Task Analysis program you will be entering what percentage correct needs to be achieved for mastery criteria to be met (applicable for manual and automatic progression), and/or entering a percentage correct to trigger revisions criteria (applicable for auto progression only).
Depending on how you have your success criteria configured, any of the following might occur following success criteria detection:
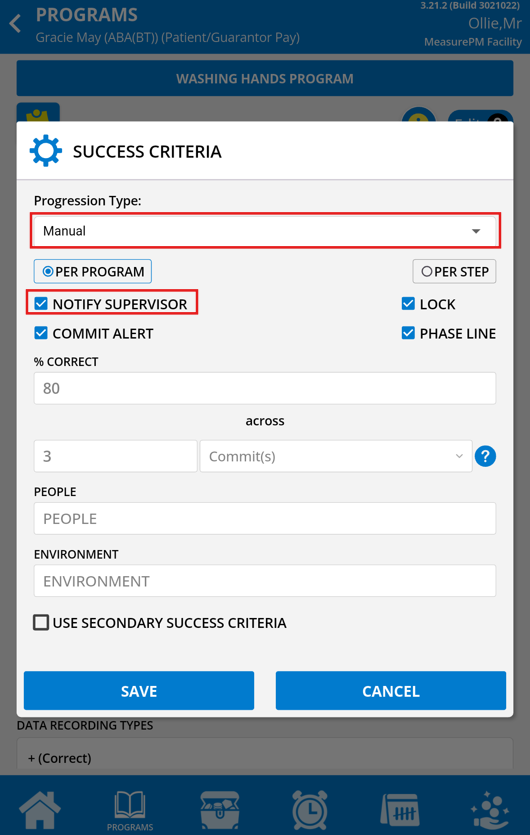
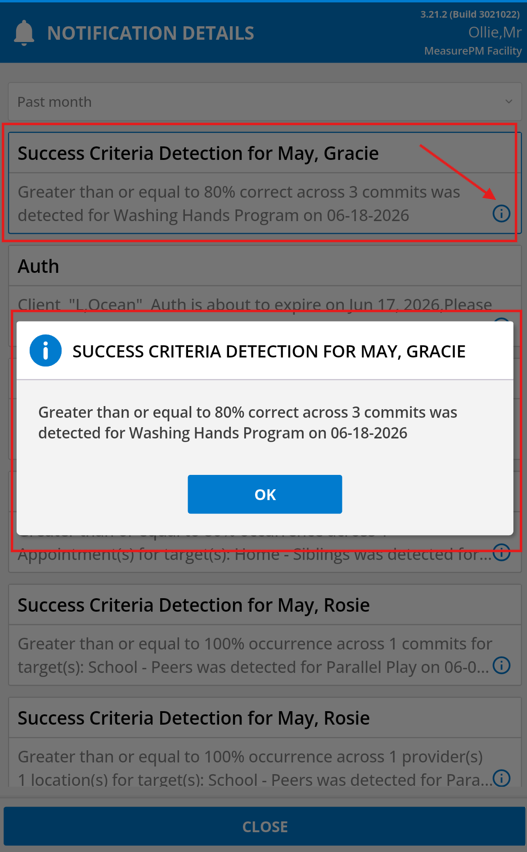
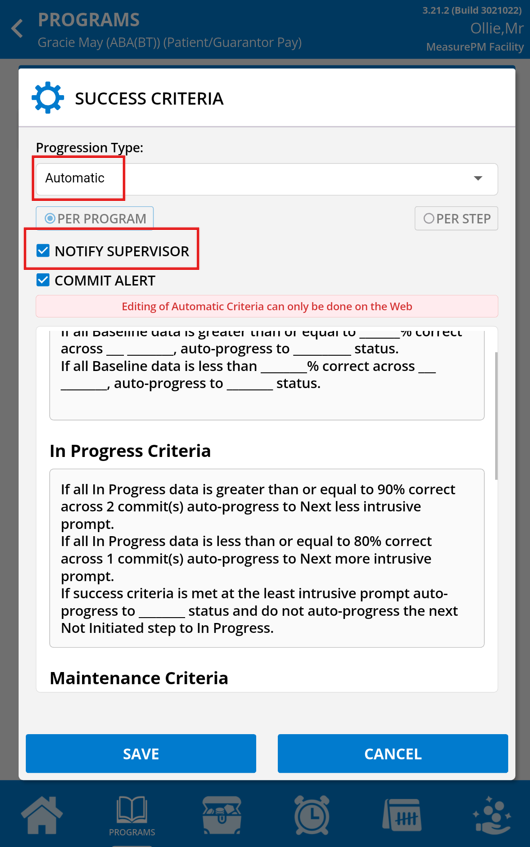
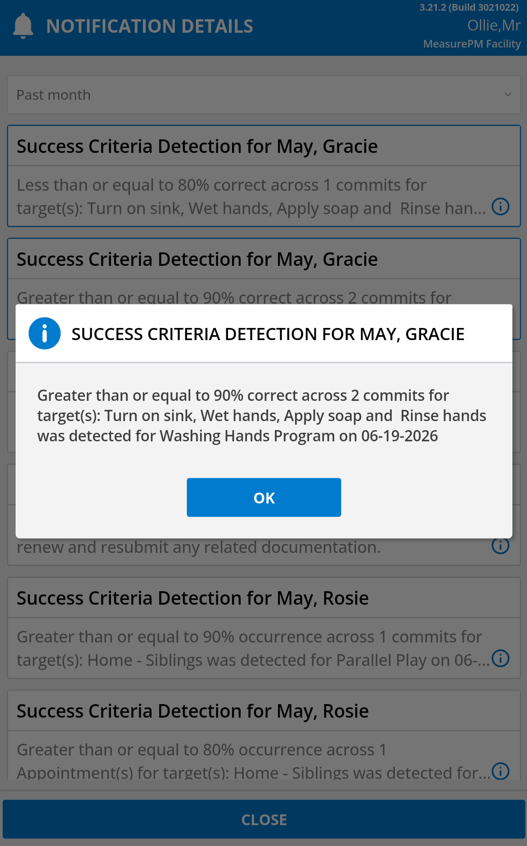
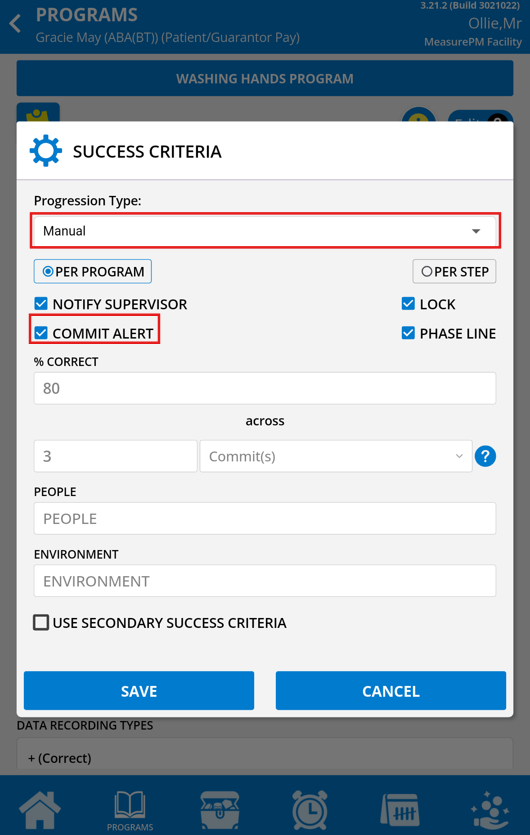
Notify Supervisor- If this option is selected, the individuals outlined as supervisors in the clinical profiles will be alerted that success criteria was detected via notifications.
E.g.,
Manual
 |  |
Automatic
 |  | 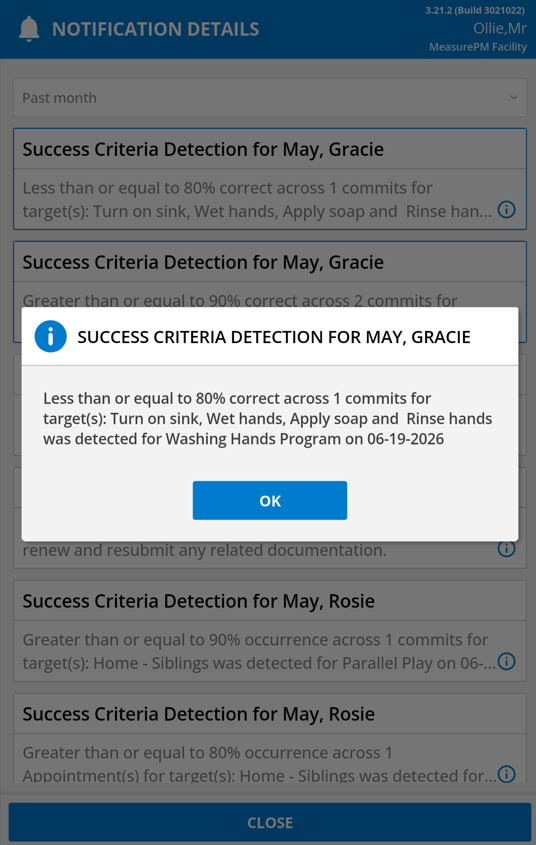 |
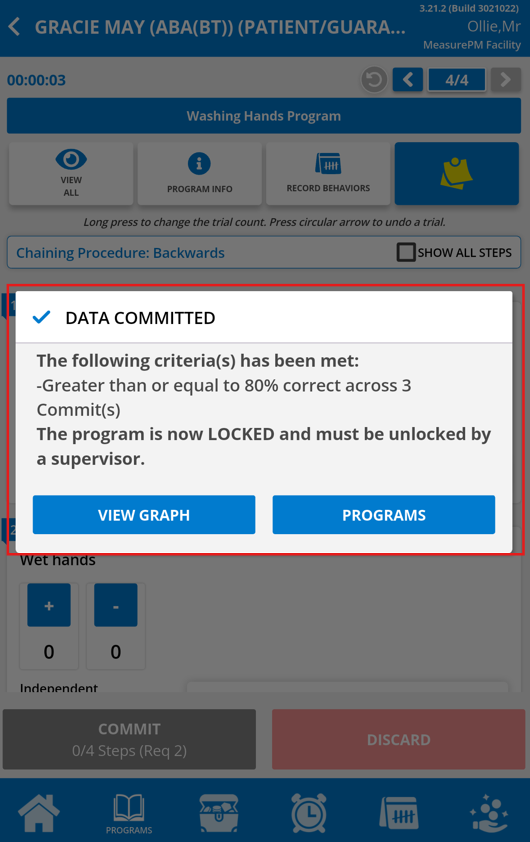
Commit Alert- If this option is selected, the user running the appointment on the Mobile-App will be notified of detection after committing the data.
E.g.
Manual
 |  |
Automatic:
 |  | 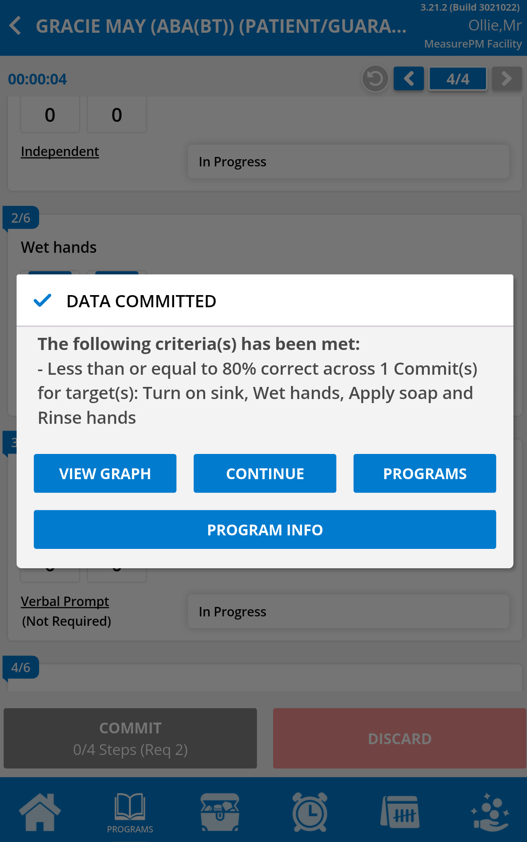 |
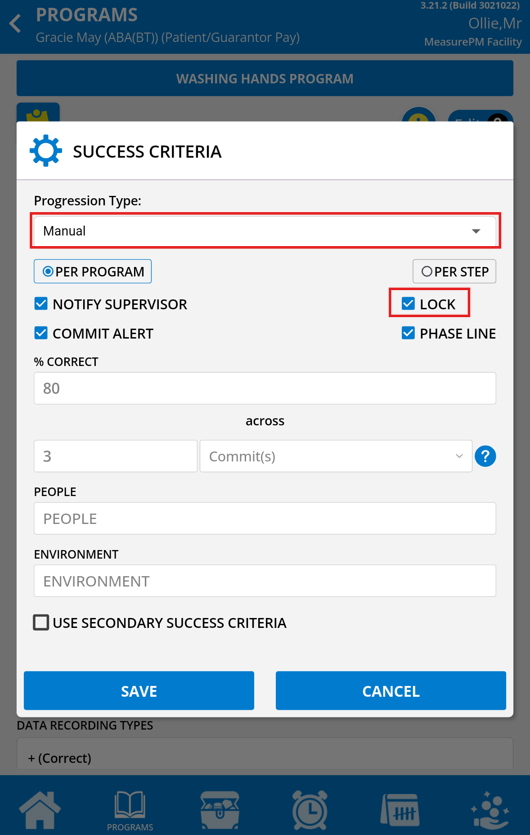
Lock- Data collection for the program will be temporarily paused and staff will be ineligible to resume data collection until a user with permission unlocks the program. This feature is only available with Manual detection.
 |  |
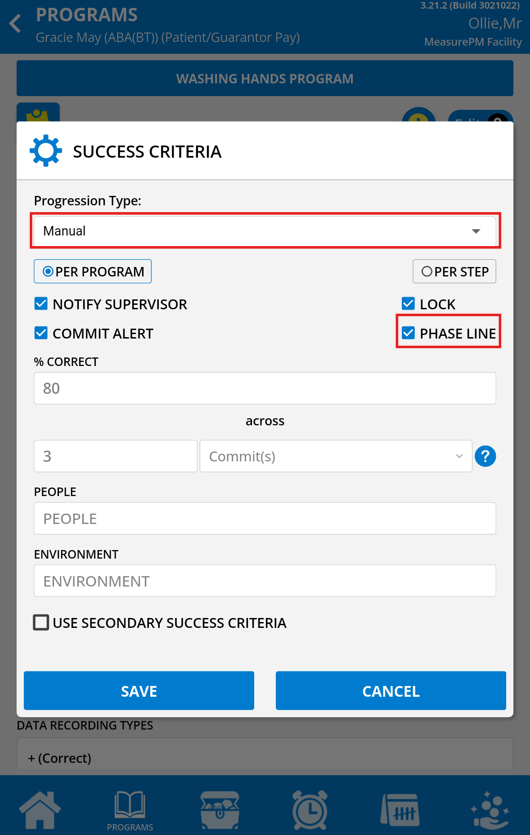
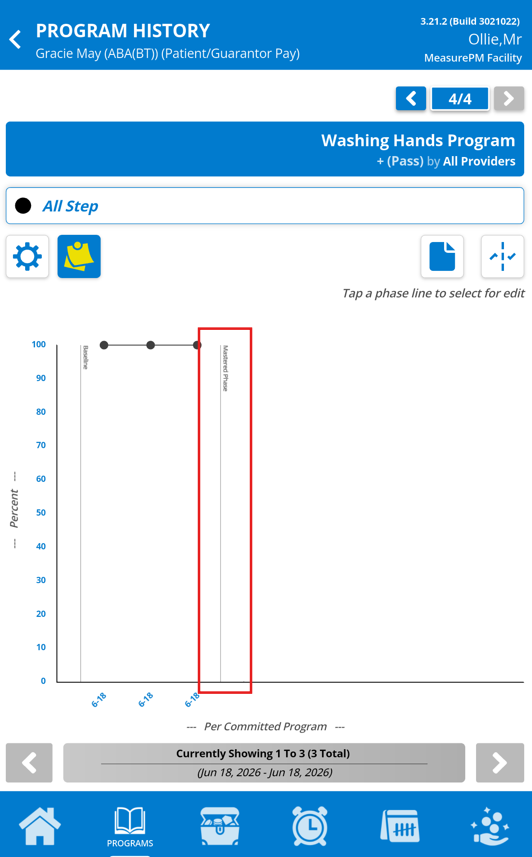
Phase line- If selected, a 'Mastered Phase' line will be added to Web and Mobile-App graphs automatically after detection. This feature is only available with Manual detection.
 |  |
For additional information on success criteria, please refer to the following guides: Clinical Programming: Success Criteria and Success Criteria - Auto Progression
Task Analysis Trend TrackingTrend Tracking for Task Analysis programs can only be configured on the Web. Within the clinical profile the user can add, remove and edit trend tracking settings. The identical action items to Success Criteria are available.

For additional information on this, please refer to the following guide: Clinical Programming Trend Tracking
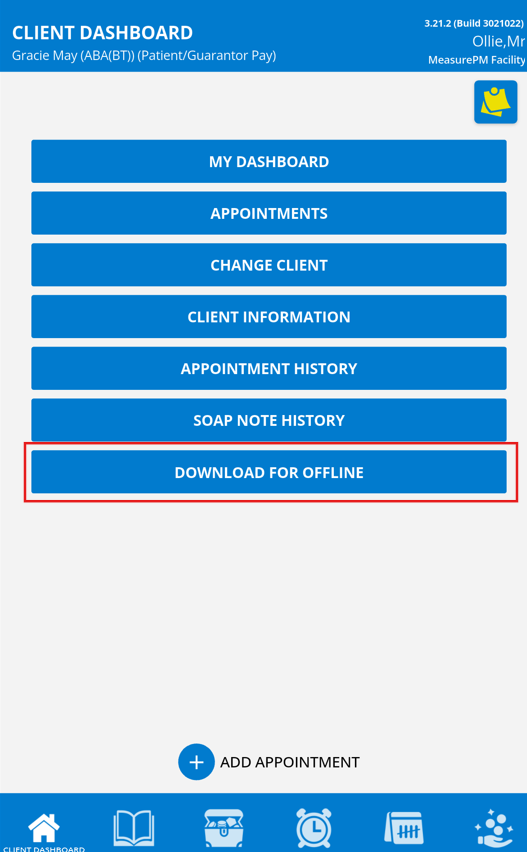
Task Analysis Offline Mode
Collecting and committing Task Analysis data is also supported in Offline mode. Before entering offline mode, ensure "Download for Offline" is selected from the client dashboard. This ensures you are going to be working with the most up to date configurations for the client while offline.
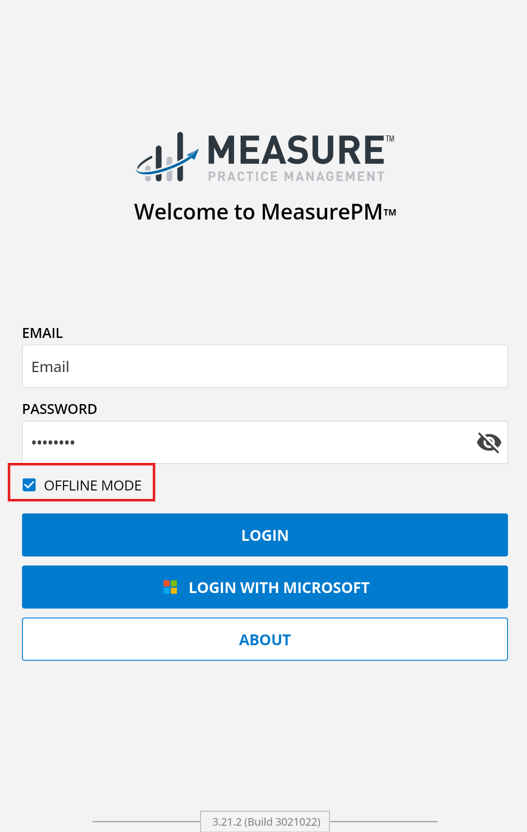
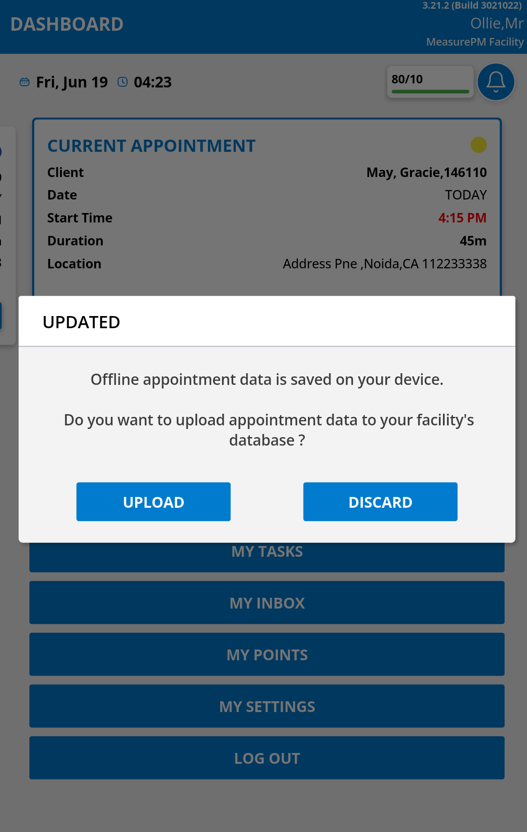
To access Offline mode, select the “Offline Mode” checkbox when logging onto the Mobile-App. From here, you can continue to run an appointment and collect data the same way you would in online mode. Note that in offline mode, you will not receive a notification after committing data. Instead, the next time you log into online mode, you will be presented with a pop up and asked if you would like to upload (i.e. “sync”) the appointment information to the data base. Selecting Upload will then send all data collected in Offline to the server and be saved. If discard is selecting, the data will not be committed and will be lost. After discarding, there is no way to retrieve the information.
 |  |  |
For additional information on offline mode, please refer to the following guide: Offline Mode
Analyzing Collected Task Analysis Data
Committed data can be analyzed in several places across the Web and Mobile-App. Below describes each area in which data can be viewed and analyzed.
Graphs
Web- Program/Behavior Graphs
When selecting a Task Analysis program to graph on the Web the default graph will be shown with a Percent Correct y-axis, and the data points on the graph will depict raw or averaged committed data (depending on the x-axis chosen). If you hover over one of the data points, the data point value will be presented, making it easy for you to view the percentage correct.
By default all steps will be grouped together and you will be viewing a graph of all passing data. However, you can view data for each individual step separately if desired or view incorrect data by utilizing the filtering options.
Default example:

Filtering example:

Web- Cumulative Graphs
When viewing cumulative graphs, you can opt to see a cumulative record of a specific program status, target/step status, or behavior status across a pre-determined time frame. When viewing program status, all programs will be included, regardless of measurement type (i.e., Task Analysis programs will be included in the cumulative program status count). When viewing target/step status, you can opt to view across all programs at once, in which case all targets/steps across all programs will be included, regardless of measurement type (i.e., Task Analysis program steps will be included in the cumulative target/step status count). Alternatively, when viewing target/step status you can choose an individual program to look at. In the dropdown menu, all programs will be available for selection, regardless of measurement type (i.e., Task Analysis programs will be available for selection). Following selection of a program, you can choose the target/step status you would like to view. For example, if I would like to see a record of all mastered status steps within my Brushing Teeth program, I will first select the program, then choose the status Mastered.
If you would like to further modify the way the data is presented you can use advanced options, however the graph presented below is an example of a default cumulative graph of the aforementioned choice.


For additional information on graphing, please refer to the following guide: Graphing Module
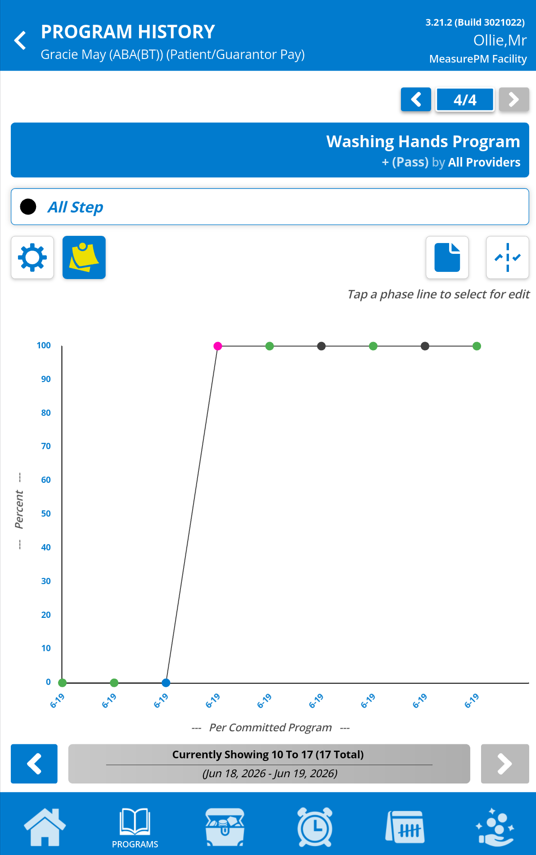
Mobile-App- Program Graphs
Task Analysis graph can be seen on the mobile app when clicking on the program and selecting "Graph Data". The user can opt to see different color markers on the graph to indicate when success criteria has been met or trend tracking has been met. Success criteria will show in green markers, while trend tracking will show in pink markers. The user may also click on the wheel icon to edit the graphing configurations opting to view specific TA steps only, or all.
Progress Reports (Web)
When creating progress report templates, you can opt for program data to be automatically populated into generated reports. If you are doing so, you can opt to include program data as either a system property (default property given to you) or as a custom property (allowing you to specify which information should populate for each program). Regardless of if you utilize the system or custom property, Task Analysis data will be pulled in. This means a small table with programming information will be displayed within the generated report.
Example:

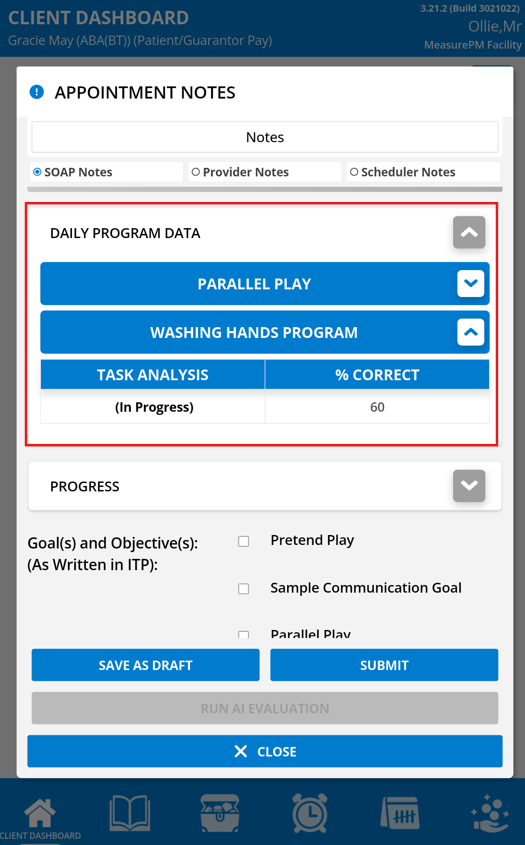
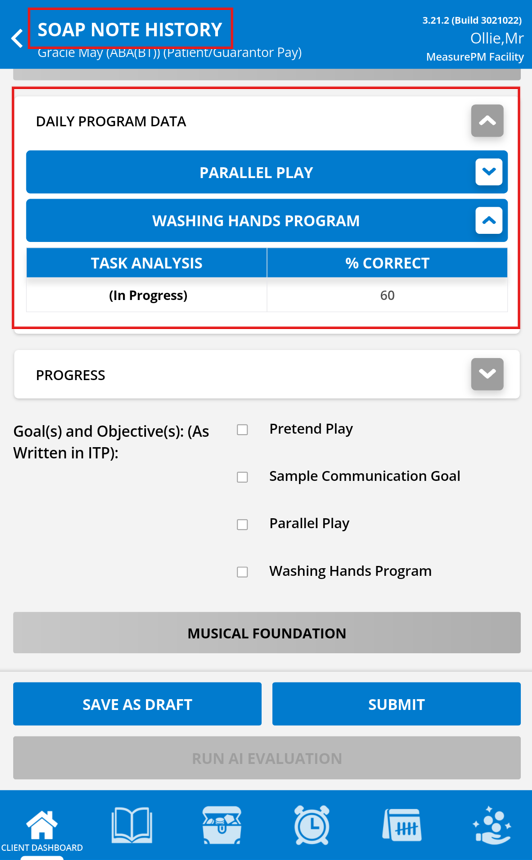
SOAP Notes (Web and Mobile-App)
There are multiple access points for SOAP notes across the Web and Mobile Applications. Across all access points the data is automatically displayed, but is slightly different in appearance depending on where you look.
Web
On the Web SOAP Notes under Appointments, Task Analysis data is displayed as below, under a specified column for Program and Data Recorded.
On the SOAP Notes Details Report, Task Analysis data is displayed as below, under a specified column for Program Data.

Mobile-App
On the Mobile-App Task Analysis data in SOAP Notes is displayed as below, under a specified column for Program and Data Recorded.
 |  |
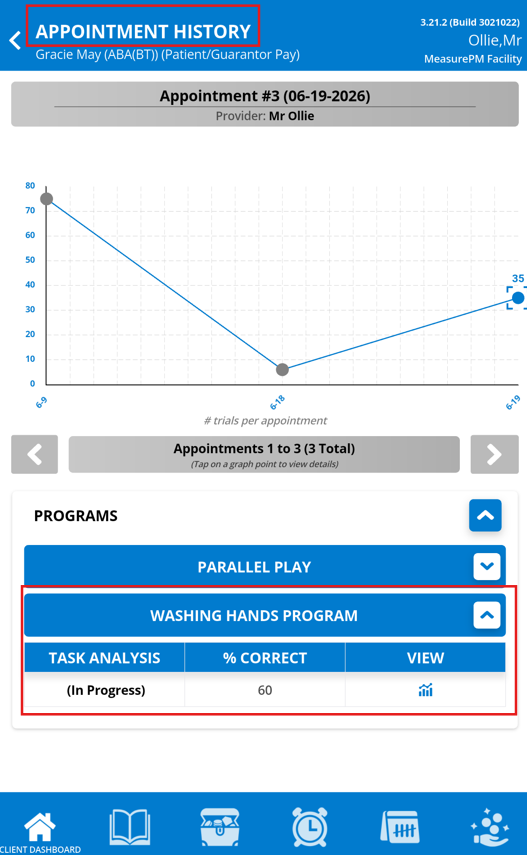
Appointment History (Mobile-App)
On the Mobile-App Task Analysis data in Appointment History is displayed as below, under a specified column for Program and Data Recorded. If no Task Analysis data were collected a – would be present as a null placeholder.
Data Reports (Web)
On the Web, Task Analysis data can be viewed across several data reports. To access reports, select Reports from your left hand navigation menu. From there, select Data Reports --> Clinical --> choose the report of interest. Program data can be seen across the Appointment Summary, Program Summary, and Trial by Trial Reports.
Appointment Summary
Within the Appointment Summary data report, Task Analysis program occurrence count will get added to the total trial count for the appointment and be reflected in the "Num Program Trials" column, as seen in the example below.

Program Summary
Within the Program Summary data report, the total number of steps recorded, total correct steps, total incorrect steps, and the percentage correct will be displayed. An example of this report is shown below.

Trial by Trial Report
Within the Trial-by-Trial report, the sequence in which each step was recorded, the status of each step, and the data recording type used will be displayed. The report will also show the total number of steps recorded and the percentage correct. An example of this report is shown below.

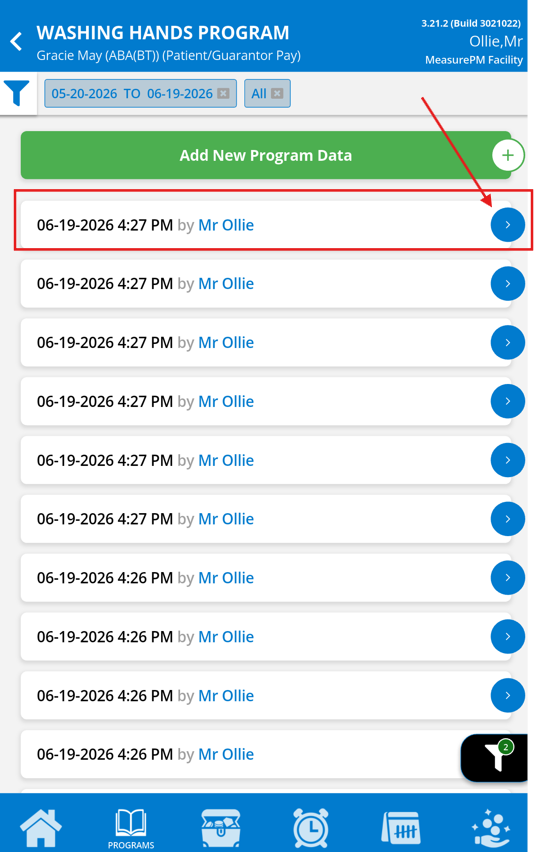
Program Data on Mobile-App
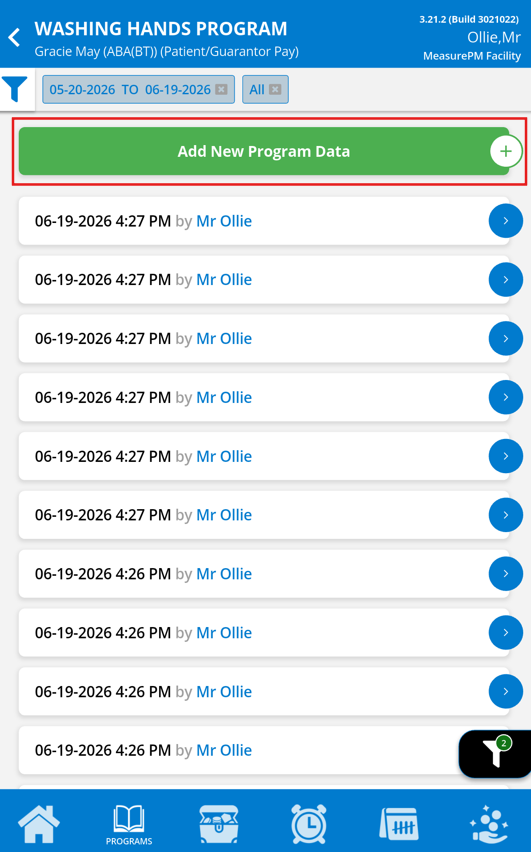
In addition to the Trial-by-Trial report, the trial by trial data can also be seen on the Mobile-App. Within the Program Data page all collected data will be shown. Along the bottom date bar, each date with a green inverted triangle is indicating that there is data present on that day. You are able to navigate to any of those dates and view the data collected.
From this page, if permission is granted you are also able to view, add, edit, and delete data. To edit or delete historical data, select the unlock icon to edit, and then proceed with making changes. To add a new set of data select Add New Program Data after unlocking and proceed with adding new data from there.
Edit Previous Data
 |  |
Add New Data
 |  |  |
For any additional comments or questions, please reach out to support@measurepm.com.