
Overview
This article was developed to provide MeasurePM users with an overview of how to view and edit clinical related settings, and where these changes will be reflected across the Web and Mobile-App.
Clinical Settings Configuration
To have access to the Clinical Settings page the following admin permission will need to be granted.

With access to the page, users will be eligible to view and edit the following settings:
- ABC Data Antecedents
- ABC Data Consequences
- ABC Data Setting Events
- ABC Data Locations
- ABC Data People
- Program Statuses
- Behavior Statuses
- Functions of Behavior
- Default Tracked Trends
- Data Recording
- DRO Data Collection Program
- Prompt Library
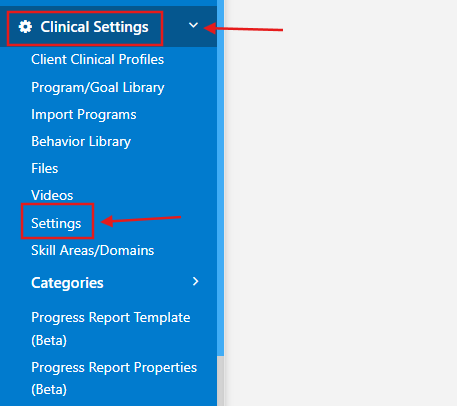
Once the configuration is enabled, the settings can be accessed by selecting the Clinical Settings dropdown, followed by the Settings option listed.
ABC Data
In the Settings tab, you can optionally add, activate, or deactivate ABC Data properties, including Antecedents, Consequences, Setting Events, Locations, and People. All properties entered here will automatically appear in each new clinical profile by default, which essentially means you are setting up a default ABC sheet for your facility. New properties added in Settings will not affect existing client profiles and will only apply to new profiles created in the future.
Setting these defaults is optional. Regardless of what is set up within the Settings tab, properties can still be configured at the client level and on the Mobile-App during appointments as needed.
By default, all properties will be active, but you can deactivate them by unchecking the active box.
- Active: The property will be included in all new clinical profiles.
- Inactive: The property will remain in existing profiles but will not be added to new ones.
ABC Data Antecedents
Within this section, Antecedents used for ABC Data collection can be added, marked as active, or marked as inactive.

To add an Antecedent, the + icon can be selected. The current order of Antecedents cannot be edited, but the new Antecedent will be added below the + icon selected. Before selecting "Save", the user will have the option to delete the newly added Antecedent. Once saved, the Antecedents can not be edited or deleted. Previous and newly added Antecedents can be marked as "Active" or "Inactive" by selecting the checkbox to the left, followed by "Save".

ABC Data Consequences
Within this section, Consequences used for ABC Data collection can be added, marked as active, or marked as inactive.

To add a Consequence, the + icon can be selected. The current order of Consequences cannot be edited, but the new Consequence will be added below the + icon selected. Before selecting "Save", the user will have the option to delete the newly added Consequence. Once saved, the Consequences can not be edited or deleted. Previous and newly added Consequences can be marked as "Active" or "Inactive" by selecting the checkbox to the left, followed by "Save".

ABC Data Setting Events
Within this section, Setting Events used for ABC Data collection can be added, marked as active, or marked as inactive.

To add a Setting Event, the + icon can be selected. The current order of Setting Events cannot be edited, but the new Setting Events will be added below the + icon selected. Before selecting "Save", the user will have the option to delete the newly added Setting Event. Once saved, the Setting Events can not be edited or deleted. Previous and newly added Setting Events can be marked as "Active" or "Inactive" by selecting the checkbox to the left, followed by "Save".

ABC Data Locations
Within this section, Locations used for ABC Data collection can be added, marked as active, marked as inactive, allow renaming within the client clinical profile.

To add a Location, the + icon can be selected. The current order of Locations cannot be edited, but the new Location will be added below the + icon selected. Before selecting "Save", the user will have the option to delete the newly added Location. Once saved, the Locations can not be edited or deleted within Clinical Settings. Previous and newly added Locations can be marked as "Active" or "Inactive" by selecting the checkbox to the left, followed by "Save". Selecting "Rename Allowed" within the dropdown will allow users to edit the Location name once added to a client clinical profile, while selecting "Cannot Rename" will not allow users to edit the Location name once added to a client clinical profile.

ABC Data People
Within this section, People used for ABC Data collection can be added, marked as active, or marked as inactive.

To add an individual, the + icon can be selected. The current order of People cannot be edited, but the new individual will be added below the + icon selected. Before selecting "Save", the user will have the option to delete the newly added individual. Once saved, the People added can not be edited or deleted. Previous and newly added People can be marked as "Active" or "Inactive" by selecting the checkbox to the left, followed by "Save". Selecting "Rename Allowed" within the dropdown will allow users to edit the individuals name once added to a client clinical profile, while selecting "Cannot Rename" will not allow users to edit the individuals name once added to a client clinical profile. The additional dropdown includes "Staff Member" and "Not Staff" (ex: Mom = Not Staff, BCBA = Staff Member).

More information regarding ABC Data can be found within the following guide: ABC Data- Configurations, Data Collection, and Graphing
Program and Behavior Statuses
In the Settings tab, you will have control over what statuses you would like to be available for Programs and Behaviors. The selections made here will define the statuses across all parts of the clinical platform from the Client Profile through reporting on Progress Reports.
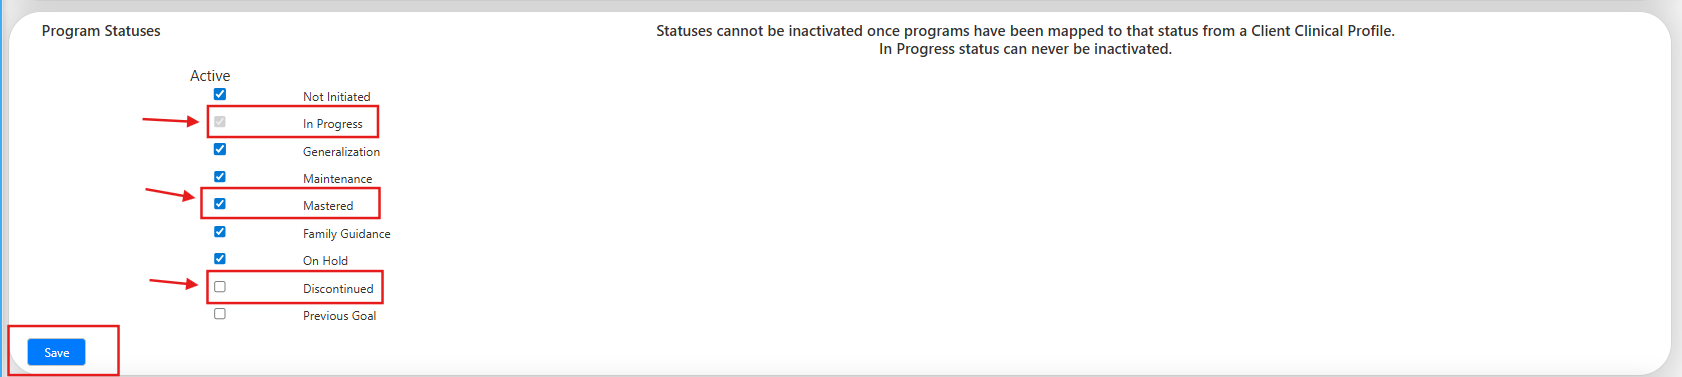
Marking a status as Active means the status will show in the client clinical profile, while marking the status as Inactive means it will be hidden. Statuses cannot be marked as "Inactive" once Programs/Behaviors have been added to that status within a client clinical profile. Additionally, In Progress status can never be marked as "Inactive".
- Programs:
| Allows Data Collection | Blocks Data Collection |
| In Progress Generalization Maintenance Family Guidance | Not Initiated Mastered On Hold Discontinued Previous Goal |
- Behaviors:
| Allows Data Collection | Blocks Data Collection |
| In Progress Maintenance | On Hold Goal Met Discontinued Previous Goal |
Program Statuses
Within this section, Program Statuses can be marked as "Active" by selecting the checkbox, or "Inactive" by deselecting the checkbox and saving. Statuses cannot be marked as "Inactive" once programs have been mapped to that status from a client clinical profile. Additionally, In Progress status can never be marked as "Inactive".
More information regarding Program Statuses can be found within the following guide: Program Status (Web and Mobile-App)
Behavior Statuses
Within this section, Behavior Statuses can be marked as "Active" by selecting the checkbox, or "Inactive" by deselecting the checkbox and saving. Statuses cannot be marked as "Inactive" once behaviors have been mapped to that status from a client clinical profile. Additionally, In Progress status can never be marked as "Inactive".

More information regarding Behavior Statuses can be found within the following guide: Behavior Status (Web and Mobile-App)
Functions
In the Settings tab, you will have control over what Functions of Behavior are available for configuration once a Behavior has been added to a client clinical profile. While Functions of Behavior are added at the site level, they can also be added at the client level. Functions configured at the site level cannot be edited or deleted once saved, however, functions manually added to a added behavior can be.
Marking a Function as Active means the Function will be available for selection when configuring a mapped Behavior, while marking the Function as Inactive means the status will not be available for selection when adding a Behavior to a client clinical profile.
Functions of Behavior
Within this section, Functions of Behavior can be added, marked as active, or marked as inactive.

To add a function, the + icon can be selected. The new function will be added below the + icon selected, and before selecting "Save", the user will have the option to delete the newly added function. Before selecting "Save", the user will have the option to delete the newly added function. Once saved, the functions can not be edited or deleted. Previous and newly added functions can be marked as "Active" or "Inactive" by selecting the checkbox to the left, followed by "Save".

More information regarding Functions of Behavior can be found within the following guide: Configuring a Behavior from a Client Clinical Profile
Trend Tracking
In the Settings tab, you will have control over what Trends are added to Programs by default once created. While creating a Program, you can further modify the Trend Tracking settings. Once the Program is mapped to a client clinical profile, the Trends can be further modified on a per client basis as well.
Within this section, default Tracked Trends can be added and configured.
- Threshold: The threshold value for the trend types represents the percentage of difference between the data points that is needed for the trend to be detected. Worse than (3/5), Worse than (3), and Better than (3/5) are the exception in that the threshold value represents the minimum or maximum percentage of correct or incorrect responses needed for the trend to be detected. When configuring the threshold, only whole numbers are accepted.
- Notify Supervisor: If the "Will Notify" option is selected, the supervisor designated in the Supervisor section of the clinical profile will receive a notification of trend detection. The notification will appear in the bell icon on the Web and Mobile-App.
- Commit Alert: If the "Will Notify" option is selected, the user who committed the data during the appointment will be notified via a Mobile-App pop-up when the trend is detected.
- Lock: If the "Will Lock" option is selected, data collection for this goal will be locked and will not be available until an authorized user unlocks the program. This ensures supervisors/BCBAs are able to review and modify instruction as needed before staff are able to resume data collection.

More information regarding Tracked Trends can be found within the following guide: Clinical Programming Trend Tracking
Data Recording Types and Prompts
In the Settings tab, you can configure the menu of Data Recording Types (DRT's) and Prompts you would like to be available for your site. The DRT's and Prompts configured here will show as available when configuring programs within the Program Library and Client Clinical Profiles. Note that any DRT marked as default will be automatically added to new programs added to the library.
By default, all DRT's and Prompts will be active, but you can deactivate them by unchecking the active box.
- Active: The DRT or Prompt is available to add to programs
- Inactive: The DRT or Prompt is unavailable to add to programs going forward, but will remain in any program that already has it selected
Data Recording
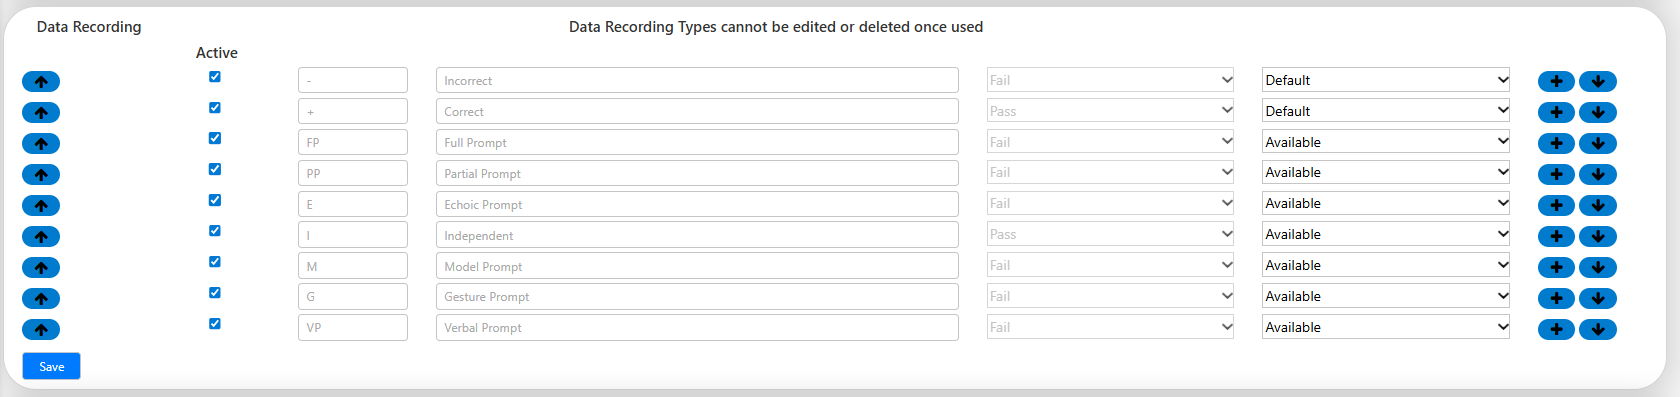
Within this section, default Data Recording Types can be added, marked as active, or marked as inactive.
To add a DRT, the + icon can be selected. When adding, you will input the DRT value. This can be any two character value (e.g., VP). This is what will be seen in the program configurations, client profile, data collection screens (if established for that program), and graph filters.
The current order of DRT's can be edited by selecting the up and down arrows. Before selecting "Save", the user will have the option to delete the newly added DRT. Once configured to a program, the DRT can not be edited or deleted. While the DRT's cannot be deleted from Settings at the program level, they can be removed from the program configurations. Previous and newly added DRT's can be marked as "Active" or "Inactive" by selecting the checkbox to the left, followed by "Save".
Prompt Library
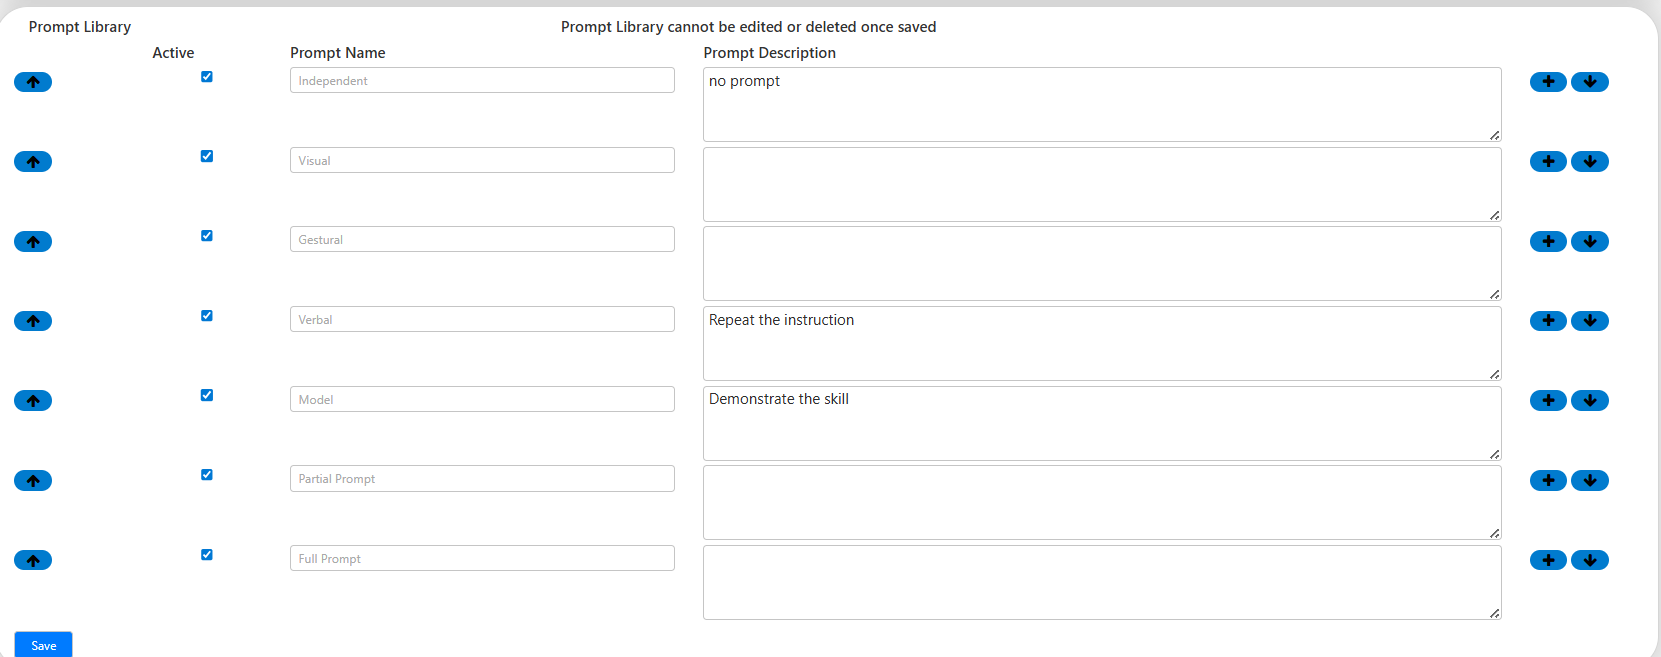
Within this section, prompts found within the Prompt Library can be added, marked as active, or marked as inactive.
To add a prompt, the + icon can be selected. When adding, you will input the prompt name, while the prompt description is optional. If a description is entered, it will auto-populate when a prompt is added to a program in the Program/Goal Library or when it is added to a program in a Client Clinical Profile. However, the description can be edited on both the program and client level.
The current order of prompts can be edited by selecting the up and down arrows. Before selecting "Save", the user will have the option to delete the newly added DRT. Once configured to a program, the prompt can not be edited or deleted. Previous and newly added prompts can be marked as "Active" or "Inactive" by selecting the checkbox to the left, followed by "Save".
More information regarding Data Recording Types and Prompts can be found within the following guide: Prompts vs Data Recording Types
DRO
If you would like to have the DRO board automatically collect DRO data, you will first have to select a Program within the Settings tab. The DRO Program cannot be changed within any client clinical profiles, and the Program selected within the Settings tab will also have to be mapped to the client clinical profile using the +Program Library.
The designated DRO program must be in one of the following statuses to be enabled:
- In Progress
- Maintenance
- Family Guidance
- Generalization.
DRO Data Collection Program
Within this section, the program used for DRO data collection can be selected from the dropdown.
The programs listed as an option are previously created programs within the Program/Goal Library. Only DTI and frequency programs are available for selection. The program selected must only have 1 pass and 1 fail Data Recording Type assigned to it on the program configuration page.

More information regarding DRO Data Collection can be found within the following guide: DRO Board- Set Up and Use
For any additional questions or concerns, please reach out to support@measurepm.com